From the directory where you have our .pem file stored
ssh -i informacam.pem ubuntu@[OUR AWS IP]
That's all!
Please don't forget to log out when you're done working (money doesn't grow on trees!!!)
In your ssh config file (on a mac, ususally found in your home directory at: /UserName/.ssh/config
Host [OUR INSTANCE IP]
    IdentityFile /path/to/your/pem/file
If that's done correctly, you can open up your favorite text editor, and open an SFTP browser with the following:
host: [OUR INSTANCE IP]
username: ubuntu
there is no password required, because you have a .pem!
In our amazon cloud instance, the server's files are usually located in /mnt/j3m/interface.
From the top level of the InformaCam-Server folder, run
mvn jetty:run
User.login(String username, String password)
returns: boolean
callback: User.loadSession() on success
User.logout(void)
returns: boolean
callback: User.unloadSession() on success
User.changePassword(String oldPassword, String newPassword, String confirmNewPassword)
returns: boolean
callback: User.reloadSession() on success
Search.query(object parameters)
returns: object[] derivative
Search.getSavedSearches(void)
returns: object[] savedSearch
Search.loadSearch(String savedSearch._id)
returns: object[] derivative
Search.saveSearch(object parameters, String alias)
returns: boolean
Media.getAll(void)
returns: object[] mediaShortDescription
Media.load(String mediaShortDescription._id)
returns: object derivative
Media.annotate(String mediaShortDescription._id, int timeIn, int timeOut, String content, String user._id, long timestamp)
returns: boolean
Media.sendMessage(String medaShortDescription._id, long timestamp, String user._id, String content)
returns: boolean
Source.view(String source._id)
returns: object source
Source.addDetail(String source._id, String key, object value)
returns: boolean
The API for the InformaCam API will be RESTful, and built using python/tornado. The initial implementation will focus on "modules" speaking to each other. The initial expected modules/components are:
- storage server
- intake service (cert authority + upload)
- API service (tornado/python + couchdb REST calls with JSON returns)
- Phone module
- Web admin front-end (sammy, custom javascript, etc.)
Modules wishing to PUT/GET using the API must have a registered certificate with the InformaCam Server intake service in order to be granted access. This initial implemenatation will utilized this as its authorization mechanism during this initial implementation, instead trying to develop out a public-facing API that could conceivably require authorization approaches like OAuth, etc.
The web admin front-end will be as divorced from python as feasible, removing the majority of dependencies (e.g., avoiding python templates, etc.).
| Path | Method | Description |
| /v1/derivative | GET | Get a media object's derivative record(s) by id |
id parameter must be provided or will return as bad request.
| Name | Data Type | Required/Optional | Description | Use |
| id | string | required | unique id(s) used to identify a media object derivative record within InformaCam system's database | By default (when no additional parameters are added) an array for each of the objects is returned that includes the following: _id, alias, media type, time record was created, save location, submitted by, derivative thumbnail. To have additional metadata returned additional parameters must be supplied |
| sort | string | Optional | sort order of media records returned | Sort by (default date media is created): * dateSubmitted * dateCreated (date record created) * submitter |
| not_truncated | boolean | optional | if true return full derivative record | |
| geneology | boolean | optional | if set to true, full geneology information will be returned | metadata returned: device id, ownership type, datetime media created on, datetime submitted, about the device, and device integrity |
| description | boolean | optional | if true returns custom categorical metadata added on server side | data returned is dependent on custom metadata implemented by organization (e.g., categorization, description, |
| form | boolean | optional | if true returns form data submitted through mobile device | dependent on implementation |
| annotations | boolean | optional | if true returns annotation data within the J3M | |
| locations | boolean | optional | if true returns locations array (multiple lat/long locations recorded with J3M at time media is being recorded) | |
| keywords | boolean | optional | if true returns array of keywords | |
| region_bounds | boolean | optional | if true returns array of region bounds |
Example
/v1/derivative?id=1,2,3&truncated=false&sort=dateCreated
Returned
Truncated example {
}
Full Example {
}
| Path | Method | Description |
| /v1/search | GET | Search media records |
Records returned in a search will always be truncated, and will include the following: _id, alias, media type, time record was created, save location, submitted by, derivative thumbnail. Additional parameters will be provided dependent on the parameters requested.
At least one of the following parameters (except limit) but be supplied or will return bad request.
| Name | Data Type | Required/Optional | Description | Use |
| limit | int | optional | identify number of records to return | |
| sort | string | Optional | sort the order of media records returned | Sort by (default is relevancy rating): * relevancy * dateSubmitted * dateCreated (date record created) * submitter |
| term | string | optional | keyword search object records | |
| dateCreated | timestamp (?) | optional | search by date media was created | |
| dateSubmitted | timestamp (?) | optional | search by date media was submitted | |
| type | string | optional | search by media type | options: image, media |
| location | array | optional | search for objects within a geographical bounds | array should be formed similar to {"lat":0, "lng": 0, "radius": 5, "measure": "km"}. Measure can be kilometers (km) or miles (ml); default is km. radius can be decimal, default is 1. lat, lng should be down to (?); lat,long must be provided |
| custom | array | optional | search for objects using custom metadata fields | array passed should contain each custom term, followed by string of search query. E.g., custom={"ethnicity":"french", "status":"needs review"} |
Example
/v1/search?term=my+dog&type=image
Returned
{
}
TBD. Flesh out w/ Harlo better
| Path | Method | Description |
| /v1/derivative | POST | Create a new derivative record when a media file is submitted/accepted to repository |
| Name | Data Type | Required/Optional | Description | Use |
| j3m | json | required | decrypted j3m metadata (as a JSON object) is used to create a derivative record of a submitted media file | stringify json object before passing |
Example
/v1/derivative?j3m=stringJSONhere
| Path | Method | Description |
| /v1/updateRecord/[derivative id here] | PUT | Update metadata fields for an existing derivative record |
| Name | Data Type | Required/Optional | Description | Use |
| id | alphanumeric | required | unique id used to identify a derivative record within the InformaCam system's database; the geocouch document id | ID should be appended to the URL as the final locator in the path |
| description | string | optional | add/update a description to the record of a submitted media file | this does not effect the original J3M submitted, only the derivative record created for the admin view |
| alias | string | optional | add/update a title to the record of a submitted media file | |
| tier | string | optional | add / update a tier of a record of a submitted media file | IBA specific |
| status | string | optional | add / update a status of a record of a submitted media file to reflect that it has been review/approved by repository staff members | IBA requested; also helps meet ISO standard for trusted digital repositories |
| custom | json | optional | add custom field and corresponding value to a derivative record within the InformaCam system's database | pass stringified json array in the following format, to identify the key and value to add: {'key here': 'value here'} |
Example
/v1/updateRecord/12345a2345?alias=this+is+a+new+title+for+this+record
The app performs encryption on three levels at various points.
Media Hashing is the process of fingerprinting a media source (image or video) by taking the cryptographic hash of its pixel values. A group of pixels are run through an SHA-1 hashing algorithm, and the resulting string can be referenced at any point in order to verify the authenticity of that media source.
InformaCam hashes the entire image both before and after image redaction on save.
Each image region that has been either pixelated or redacted is hashed as well.
The image hashes are persisted in the metadata JSON object for each resulting image file.
If the user specifies this in their preferences (under Original Image Handling), the original image may persist in the encrypted database, rather than unencrypted on the SD card in the standard image gallery, or deleted entirely. Future iterations of the app will include a file system for viewing the images stored in the ecrypted database.
The metadata JSON Object is encrypted to each trusted destination using PGP encryption. The resulting string is inserted into the metadata of the image (above the JFIF header.)
The repo for this project is here.
MyTouch (HTC Sense)
Android Version
2.3.4
Kernel Version
2.6.310-g4dcb781
Build number
2.32.531.1 CL209954 release-keys
Notes:
Incompatibility with bouncycastle API as currently built (11/7/12)
-agreeToLicense yes -destinationFolder /path/you/choose -outputFile /path/you/choose/output_file.txt
Building Informacam from source requires the following project dependencies:
- IOCipher (https://github.com/guardianproject/IOCipher)
- android-ffmpeg-java (https://github.com/guardianproject/android-ffmpeg-java)
- Note:
- The README instructs you to export the NDK. You might also need to export the path to get this to work. Run the following inside of the external/android-ffmpeg directory, before building:
export NDK=/path/to/ndk/installation
export PATH=$NDK:$PATH
B. Build IOCipher
- (To do this in Eclipse, go to [project] > Properties > Android and check Is Library)
- The library jar that will be created, will be located at: [project]/bin/android-ffmpeg-java.jar
- Note:
- The "make -C external" and "ndk-build" commands will not work if you have not set the path to the NDK inside of the iocipher root directory. Run the following inside of the iocipher root directory, before building:
export NDK=/path/to/ndk/installation
export PATH=$NDK:$PATH
E. Check that the target APIs for ffmpeg and InformaCam match
- Open the Project > Properties > Java Build Path
- You should see these libraries' jar files with broken links; edit these to point to the library jars noted in the above projects
- then open the Project > Properties > Android
- Make sure Is Library is not checked
- Under Reference on this page, make sure the IOCipher and Android-ffmpeg-java libraries are listed/added
F. Make sure you have enough memory
- Project > Properties > Android
- make sure the checked API level matches
- on a Mac
- control + click on the Eclipse application
- Select Show Package contents
- In Contents > MacOS you will find eclipse.ini
- on Ubuntu
- this file should be located in: /usr/lib/eclipse/eclipse.ini
- Change the following to be allocated to somewhere between 1024 and 2048:
- launcher.XXMaxPermSize
- -Xms
- -Xmx
So the final code should look something like this:
--launcher.XXMaxPermSize
2048m
--launcher.defaultAction
openFile
-vmargs
-Xms2048m
-Xmx2048m
5. Push to phone
Because of specific hardware requirements, it is likely that an AVD will not be appropriate for debugging and development testing. It is suggested that you instead push to a Android device.
The repo for this project is currently here.
In any image or video, groups of form responses can be inserted via the UI. Regions can have bounds, like x/y coordinates and timestamps, but they do not have to, as is the case with the top-level annotations. So, now, no matter what your UI does, you can append form objects to media by adding the IForm object to the IRegion's associatedForms list.
The resulting JSON output for the IMedia object is below. (Since this media object contains a top-level region, that region's bounds are all 0s and -1 for its timestamp.)
{dimEntry":{
    "originalHash":"c478b5808d14c273e5a58f0389dfd84225f1dd38",
    "id":16011,
    "exif":{
        "exposure":"0.030",
        "orientation":1,
        "flash":-1,
        "model":"GT-N7100",
        "iso":"125",
        "location":[
                40.70903778076172,
                -73.96454620361328
        ],
        "width":1280,
        "whiteBalance":0,
        "aperture":"2.8",
        "focalLength":-1,
        "timestamp":"2013:07:11 15:27:59",
        "duration":0,
        "height":960,
        "make":"SAMSUNG"
    },
    "timeCaptured":1373570879000,
    "name":"20130711_152759.jpg",
    "uri":"content:\/\/media\/external\/images\/media\/16011",
    "mediaType":"image\/jpeg",
    "thumbnailName":"20130711_152759_thumb.jpg",
    "size":300682
},
"bitmap":"\/c478b5808d14c273e5a58f0389dfd84225f1dd38\/20130711_152759.jpg",
"isNew":false,
"width":1280,
"lastEdited":0,
"bitmapPreview":"\/c478b5808d14c273e5a58f0389dfd84225f1dd38\/20130711_152759_preview.jpg",
"bitmapThumb":"\/c478b5808d14c273e5a58f0389dfd84225f1dd38\/20130711_152759_thumb.jpg",
"genealogy":{
    "dateCreated":0,
    "hashes":[
        "2f3ea762f6872fe9df8e7878defdd06f"
    ]
},
"associatedRegions":[
    {
        "timestamp":0,
        "id":"98f2eeb72925c5381045d3e40fa9dd2c",
        "bounds":{
                "startTime":-1,
                "displayTop":0,
                "height":0,
                "width":0,
                "displayLeft":0,
                "left":0,
                "endTime":-1,
                "displayWidth":0,
                "top":0,
                "displayHeight":0
        },
        "associatedForms":[
                {
                        "path":"\/forms\/493dde68c49e6b99556186a3e776d705.xml",
                        "title":"iWitness Free Text Annotations",
                        "answerPath":"\/c478b5808d14c273e5a58f0389dfd84225f1dd38\/form_t1373571027245",
                        "namespace":"iWitness Free Text Annotations"
                },
                {
                        "path":"\/forms\/e9a480caa90d22e4607f84a5a1ae20c8.xml",
                        "title":"iWitness Free Audio Annotation",
                        "answerPath":"\/c478b5808d14c273e5a58f0389dfd84225f1dd38\/form_a1373571027245",
                        "namespace":"iWitness Free Audio Annotation"
                }
        ]
    }
],
"height":960,
"bitmapList":"\/c478b5808d14c273e5a58f0389dfd84225f1dd38\/20130711_152759_list.jpg",
"_id":"48401d59cc2f8201817b13ce7d2dfca9",
"rootFolder":"\/c478b5808d14c273e5a58f0389dfd84225f1dd38",
"associatedCaches":
    [
            "\/informaCaches\/1373571026954_1373571048312",
            "\/informaCaches\/1373571064283_1373571079767",
            "\/informaCaches\/1373571246205_1373571254371",
            "\/informaCaches\/1373571379026_1373571401690",
            "\/informaCaches\/1373571611503_1373571620318",
            "\/informaCaches\/1373571935013_1373571937287",
            "\/informaCaches\/1373572240795_1373572282778",
            "\/informaCaches\/1373572438709_1373572443901"
    ]
}
In the output above, the answers to the forms are found in the "answerPath" field, and are inflated into the J3M Data on export.
These forms are javarosa/open data kit compliant (http://www.kobotoolbox.org/) which was a decision I made last year at the RFA conference based on discussions with Globaleaks and Martus' teams: Martus was already using ODK, so we all decided we'd adhere to that standard.
The forms in EyeWitness (I'm attaching them) are based off of specific questions the IBA said they wanted users to answer about each submission. The forms come bundled with the ICTD file, so they're available to the app whenever a trusted destination file is imported. When the media is exported, these values are extended to include the answer data, not a pointer to a file (which is only locally on the device).
When j3m data is exported, you'd see this instead:
{
    "timestamp":1368290496334,
    "regionBounds":{
        "displayTop":200,
        "height":240,
        "width":240,
        "displayLeft":200,
        "left":400,
        "displayWidth":120,
        "top":400,
        "displayHeight":120
    },
    "index":0,
    "id":"98f2eeb72925c5381045d3e40fa9dd2c",
    "associatedForms":[
        {
           "namespace":"iWitness Free Text Annotations",
           "answerData": {
                "iW_free_text":"i'm on a boat!"
           }
       }
    ]
},
{
    "timestamp":1368290496742,
    "id":"98f2eeb72925c5381045d3e40fa9dd2c",
    "associatedForms":[
        {
           "namespace":"iWitness Free Text Annotations",
           "answerData": {
                "iW_free_text":"this is the boat on the sea."
           }
       }
    ]
}
The first object pertains to a region of interest within the image, and has a bounds object and an index. The second object is missing those two fields, and therefore can be considered to pertain to the entire media object. InformaCam does not rely on these differences, so it's up to a 3rd-party app to make use of this differentiation if necessary. The library has two helper methods: IMedia.getInnerLevelRegions() and IMedia.getTopLevelRegion() so developers can make use of this data in-app.
The workflow is similar to that of ObscuraCam, but with a few key differences. Notice that on start-up, the app triggers the on-board sensors. (Notifications in the top right corner clearly indicate the GPS and Bluetooth modules have been turned on.) This allows the app to register sensory and atmospheric data throughout the session. These “bundles” of data contain the following:
Whether the user is taking a picture, or editing an existing piece of media, the app registers the goings-on, and signs each bundle of data with the user’s public key. This mean that all actions taken on a piece of media (from capture to editing) are attributed to the user.
As with ObscuraCam, the user can perform image filtering and obfuscation on image regions. InformaCam also adds the “Identify” filter, which prompts the user for the subject’s name (or pseudonym) and to fill in whether or not the subject has given his or her consent to be filmed. This checklist of subject permissions can be further developed to match the needs of any organization to provide further protection to the people in front of the camera. Notice again the sensor notifications: the context surrounding each edit to the image is recorded and will be inserted into the media as metadata once the media is saved.
When the user saves the image or video, a dialog appears prompting her to choose one or more “trusted destinations.” This could be an organization, a news outlet, or any friend whose PGP key is known to you. A copy of the unredacted, data-rich image will be created and encrypted to those parties. At the same time, a redacted and data-stripped version is made available to share with anyone, anywhere.
The metadata is organized in four categories: intent, consent, geneaology, and data. Here’s a rundown of what these categories mean.
This expresses information about the media’s creator, and the rules governing how this particular media object can be shared, and to whom.
This bucket of information regards the subjects contained in the image. Each subject is identified (by a name or pseudonym selected by the user) along with their stated preferences regarding treatment of their likeness. For example, if Bobby insists that he wants his face to be fully redacted (rather than blurred) this preference should be registered in metadata.
This information regards chain-of-custody, and represents how the media was acquired, and if a particular image or video is a duplicate of another.
This category includes all standard metadata (timestamp, acquired sensory data, location and movement data) that have been collected during the lifetime of the image, from the moment it was opened to the instant it was saved.
A sample metadata bundle for an image taken with InformaCam looks like this in JSON notation:
{
"data":{
"device":{
"bluetoothInformation":{
"selfOrNeighbor":-1,
"deviceBTAddress":"00:25:36:79:EC:6C",
"deviceBTName":"nexxxie"
},
"imei":"363289131048142"
},
"sourceType":101,
"imageRegions":[
{
"regionDimensions":{
"height":256,
"width":256.00006103515625
},
"regionCoordinates":{
"left":527.705078125,
"top":196.15255737304688
},
"obfuscationType":"Identify",
"location":{
"locationType":11,
"locationData":{
"gpsCoords":"[40.7085011,-73.9668647]",
"cellId":"36789325"
}
},
"captureTimestamp":{
"timestamp":1326216508313,
"timestampType":7
},
"subject":{
"consentGiven":"general_consent",
"informedConsentGiven":true,
"subjectName":"Harlo!"
},
"unredactedRegion":"I@4070cf30"
}
],
"imageHash":"f18e7510faaad0d942db68b5c75f219a",
},
"geneaology":{
"dateAcquired":0,
"localMediaPath":"\/mnt\/sdcard\/DCIM\/Camera\/1326216520426.jpg",
"dateCreated":1326216527629
},
"intent":{
"owner":{
"ownershipType":25,
"ownerKey":"MY-IDENTITY-IS-HERE"
},
"securityLevel":1,
"intendedDestination":"[\"harlo.holmes@gmail.com\"]"
}
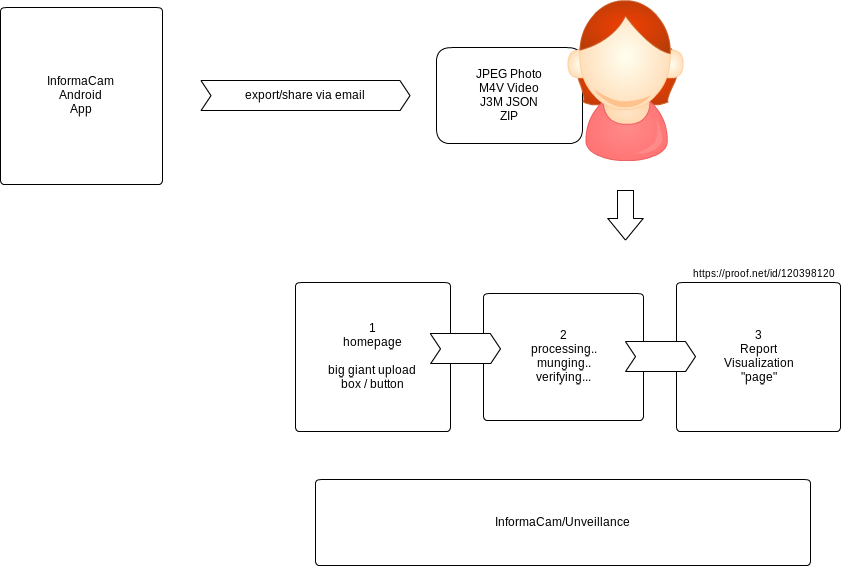
Based on the existing Unveillance v1 and the new Informa Annex engine, the new Dashboard v2 project creates a very simple user experience for the InformaCam backend analysis, verification and visualization tools. The goal is to allow any file shared or exported from the InformaCam Android app to be easily upload, unpacked, verified and visualized through a web user experience. The result is a permalinked report that can be easily shared online.
"Activist Allie documents police brutality with her smartphone and was luckily using InformaCam when she did it. She immediately presses the share feature, which posts the file first to InformCam site for verification & notarization, and then prompts her to post it somewhere else via an Android 'Share'. She uploads it to Twitter, and @ cc's a local newspaper, and journalists she follows. In the Tweet is a permalink to the InformaCam verification&visualization page."
"Reporter Rick receives an email with photo it from an anonymous source, covering an important bit of breaking news. The source says it was taken with InformaCam, and that it can be verified and visualized at the InformaCam site. Rick uploads the attachment from his iPhone, and see that the photo verifies, and learns about the time, data, place and more"
"A human rights organization has supplied smartphones with InformaCam to document warcrimes in a war zone. There is only GSM/SMS coverage so users can take video, and then share the hash id values via SMS to a designated contact number. Weeks later when the video files are sneakerneted out of the area, they are uploaded to the InformaCam site, where the displayed and verified hash id values can be matched against the ones received by SMS on the day of capture"
"Robin is a building contractor who gets in a dispute with a customer, and is taken to small claims court. Robin produces photos of the work that was completed, taken with InformaCam and shared to the site, along with print outs and links of pages of the INformaCam site pages proving the photos are real, along with the time, date and map. An expert witness from the InformaCam team is called in to explain how it works, and Robin wins the case"
"Blogger Bo is covering a hurricane that has caused flooding in Long Island. Bo gets a bunch of photos showing sharks in swimming pools, that the source says are true, because they were taken with InformaCam. Bo uploads them to the InformaCam site, which immediately shows that they do not verify, and were tampered with. It also pulls up the original photos that had already been shared+verified by the original source who took them."
It is important to understand the save process when using InformaCam, as it effects how and what is stored, and any privacy concerns you might have around this media.
When you record video with InformaCam, it is using your phone's camera. Therefore, this recorded video will be stored in the default Android storage, in the standard Android device format, unaltered when you click 'Save' the save button. At the time that you complete recording a video and click Save, the video will open inside of InformaCam. However, it is important to note, that while this video has opened inside of InformaCam this video has not yet been 'saved' to InformaCam. At this point the video has not been protected or altered it has only been saved to the default Android storage. Instead, you must also actively save the video to InformaCam before it will be effected by the Save Media Preferences you have set.
Note: If you have saved a piece of media, and it is not showing in InformaCam's Media Manager, you probably have saved the media, but have not saved it to InformaCam. Informacam uses your normal video camera to record videos. You must take an extra step, and intentionally save it as an InformaCam video in order for it to be managed by InformaCam.
Note: this block will appear throughout a video at this location, unless you also set in and out points for it
When adding a Path, in a sense you are making an animation out of a pixelation or redact Region. with the Region moving along a path you define. You must first set a pixelation/react Region, and then create a path between the start (In point) and end (out point) of the path you would like for this block to follow. Note: for a highly active choppy piece, you can will likely have to create multiple block animations to effectively obscure an object or someone's face.
[finish this up]
InformaCam:
InformaCam, part of the SecureSmartCam suite of mobile apps, is a tool that enables you to embed metadata (e.g, geolocation information, edits made, etc.) into video or still images; encrypt your media while you store it on your mobile device; and securely send media to a trusted destination, that is are capable of accepting, verifying and securely storing InformaCam media.
Annotation
A small descriptive chunk of text that be added to an InformaCam Region.
Region
A region is rectangle or square shaped layer, that is filled with pixelation or a black out, and is layered on top of a video or image within InformaCam in order to obscure that portion of an image (e.g, can be used to hide someone's face).
Chain of Custody
If you are using the InformaCam phone app in combination with the InformaCam server, a certificate will be created for your device, and registered with the server. This certificate will be used to verify the identify and authenticity of the device as it is transmitted. In addition, This
Device Signature
At that time the InformaCam app is installed on a mobile device, a device key is created using PGP technology, and signed by the user (the user creates a password). This password-verifiable PGP key is the Device Signature used to identify an InformaCam mobile app. This signature enables a Trusted Destination to authenticate the identity of device when media is submitted to its server for storage.
Keyframe
This is a frame within a video file, that has been selected to be either the start (in point) or end (out point) of a InformaCam Trail.
Media Editor
The Media Editor is the primary InformaCam user activity space. Within the Media Editor a user can view a media file; gain access the tools to add an InformaCam Region, Trail or Annotation to a media file; and save and submit a file to an InformaCam trusted destinations.
Media Manager
The InformaCam Media Manager lists all of the media that is currently saved locally to InformaCam. It identifies media type (image or video), and the last time it was saved. Use the Media Manager to open, rename, delete, and export InformaCam files (exporting is not the same as submitting a file to a trusted destination).
Encrypting Metadata
Any metadata that is generated for an InformaCam file is encrypted using PGP technologies. The phone app encrypts the metadata using the Device Signature (that was generated at the time InformaCam App was installed on the device), which can then be decrypted by a Trusted Destination when a user submits an InformaCam file. This
Metadata
In the context of the InformaCam system, metadata refers to the descriptive data that is added to an InformaCam video or image (e.g., geolocation data), any annotations that a user has added, Regions that have been added, a log of the edits that have been made to a file since its original capture, and so on. This metadata is stored as JSON object, and inserted into the structural metadata of a media file.
PGP
PGP (pretty good privacy) is a data encryption system that allows user to sign, encrypt and decrypt electronic communications and files. The InformaCam system uses PGP in combination with other security technologies, as a part of sharing and authenticating files submitted from an InformaCam app to an InformaCam Trusted Destination.
Submit
Submit is the action of sending an InformaCam file to a Trusted Destination, using an uninterrupted, verifiable chain of custody.
Trail
A trail is the path that a Region follows within a video to obscure a moving portion of video (e.g., someone's face as they walk). An InformaCam Trail can be thought of as essentially a InformaCam-specialized computer animation.
Trusted Destination
Trusted Destination are contacts that you register in the phone app, that you have approved and whom you have shared your public PGP key (so are able to read your encrypted media files). However, the combination of the InformaCam App and the InformaCam Server system enables InformaCam create and record an uninterrupted chain of custody, so the media submitted is verifiable. To ensure the safety and chain of custody of your media, choose an organization that you feel comfortable with as your trusted destination.
Tween
This is the process in which InformaCam generates the frames between the in and out points that have been set for a Regions Trail. Tweening a Region in InformaCam is the same concept as tweening a computer-generated animation, in which multiple frames of the animation (in this case the Region) are created between a start and an end point, in order to give the appearance of smooth motion.
The tutorials will be a JSON combination of steps and glossary terms created above:
Tutorial 1: OverviewTutorial6: Get Help (basic contact information? place for organization to put their contact info)
Genealogy
In the context of the InformaCam system, the Genealogy provides the time of creation of a piece of media on its submitting device, and the time of submission of the media to a dedicated InformaCam digital repository.
Device Integrity
In the context of InformaCam system, the Device Integrity is how certain an InformaCam system can be that a piece of media was captured on a 'registered' device. The integrity is established by a system of verfications, and encryption technologies. [link to InformaCam overview from phone app documentation].
*Submitted by
In the context of InformaCam system, Submitted By refers to the device (and its corresponding device signature) that was used to capture a piece of media and to submit to a dedicated repository. It does not refer to a human user, who could be in possession of more than one device signature. This device signature is established [link to device signature information from phone app documentation]
TDB
TBDADMIN
Change Password
-TBD
Change Language Preferences
-TBD
Manage Clients
This installation document assumes you are on Ubuntu, and that the base directory will be home/ubuntu. Make a directory that will house the packages you need to install, as well as a number of directories that will be used by the InformaCam system:
mkdir packages clients engine interface log scripts synergy
If this is a fresh install, remember to update your repositories.
sudo apt-get update
There are a few packages that you will need to assist you in the installation.
sudo-apt get install git
Once Git is installed, you will have to give this instance a key (or use an existing one). See these instructions on setting up an SSH key for Git:
https://help.github.com/articles/generating-ssh-keys
sudo apt-get install curl
You will need to install Oracle Java to run InformaCam Server, as CometD relies on this version of Java. It is recommended you install this version of Java before installing the other dependencies.
Note: InformaCam will be moving towards a standard Java version in future versions.
Follow the instructions provided here:
http://www.webupd8.org/2012/01/install-oracle-java-jdk-7-in-ubuntu-via.html
Make sure that Java version shows 1.7.0_10, and then update the variable to point to this version:
sudo gedit /etc/environment
Add/Update JAVA_HOME (double-check this path structure to make sure you have the correct path):
JAVA_HOME="/usr/lib/jvm/java-7-oracle"
You need the latest version of Maven installed. The working stack of InformaCam is using Maven 3.0.4 at the moment. apache.org provides a list of distros: https://www.apache.org/dyn/closer.cgi/maven/maven-3/3.0.4/binaries/apache-maven-3.0.4-bin.tar.gz . Find a working one, and copy the link to the mirror you have selected.
Go to the packages directory you created and begin the install:
cd /home/ubuntu/packages
wget {link to selected distro here}
Make sure the tar is downloaded and copy the file name.
tar -xvzf {the tar file's name}
rm {the tar file's name}
sudo mkdir /usr/local/apache-maven
sudo cp -R apache-maven-3.0.4/* /usr/local/apache-maven
Then update/add the following to your environment variables:
M2_HOME="/usr/local/apache-maven/apache-maven-3.0.4"
MAVEN_HOME="/usr/local/apache-maven/apache-maven-3.0.4"
M2="/usr/local/apache-maven/apache-maven-3.0.4/bin"
Save and close. Then update the PATH to include maven and the path to your Java install
export PATH=$PATH:$M2
export PATH=$PATH:$JAVA_HOME
Test that system now points to the correct version, and remove old versions if necessary:
mvn -version
Install the latest version of CometD. The version used in the current working stack of InformaCam is 2.4.3. You can link to the tar's available at: hhttp://download.cometd.org/cometd-2.4.3-distribution.tar.gz
Go to the packages directory you created and begin the install:
cd /home/ubuntu/packages
wget {link to selected distro here}
Make sure the tar downloaded and copy the file name.
unpack tar -xvzf {the tar file's name}
rm {the tar file's name}
cd cometd-2.4.3
export PATH=$PATH:$JAVA_HOME
export PATH=$PATH:$M2
Then install CometD into Maven; the following will skip the test scripts (process takes a while):
sudo mvn clean install -DskipTests=true
FFmpeg has branched. The official FFmpeg repo is incompatible with the requirements of InformaCam. So, you will need to use the FFmpeg branch available on git, here: https://github.com/FFmpeg/FFmpeg
cd /home/ubuntu/packages
git clone git@github.com:FFmpeg/FFmpeg.git
You need to build FFmpeg. You will need to install GCC (compiler for these packages) and some other packages that will help with build process. You also need the libx264 library:
sudo apt-get install gcc
sudo apt-get install build-essential
sudo apt-get install yasm
sudo apt-get install pkg-config
sudo apt-get install libx264-dev
Once these are installed (note: FFmpeg install takes a while):
cd FFmpeg
./configure
make
sudo make install
apt-get install ffmpeg2theora
Install lighttpd, and a dependency, php5-cgi
cd /home/ubuntu/packages
sudo apt-get install lighttpd
sudo apt-get install php-5cgi
To make sure lighttpd is installed, open a browser, and go to 127.0.0.1. You should see the lighttpd placeholder page. You will need to make some changes to lighttpd configuration later, but you need to complete the Tor installation first.
Install a stable version of Tor. You will need to add the correct repository, and add the correct gpg key before install.
sudo gedit /etc/sources.list
At the end of your sources.list add the following (the distribution for 11.10 is oneiric), and add the following:
deb http://deb.torproject.org/torproject.org <DISTRIBUTION> main
Then run the following:
gpg --keyserver keys.gnupg.net --recv 886DDD89
gpg --export A3C4F0F979CAA22CDBA8F512EE8CBC9E886DDD89 | sudo apt-key add -
sudo apt-get update
sudo apt-get upgrade
The key ring project installed above will make sure you have the most current signing key. Now install Tor.
sudo apt-get update
sudo apt-get install tor tor-geoipdb
CouchDB is the database used by the InformaCam system. It should be noted that the database itself does not contain sensitive information; it instead contains pointers to other files that do. InformaCam also uses Geocouch to perform geolocation searches of media submissions. To use CouchDB with GeoCouch, install CouchDB from source.
cd ~/
mkdir couchDB
This directory will be used later by the InformaCam system.
Install the couchdb dependencies
sudo apt-get install g++
sudo apt-get install erlang-base erlang-dev erlang-eunit erlang-nox
sudo apt-get libmozjs185-dev
sudo apt-get build-dep couchdb
sudo apt-get install libmozjs-dev libicu-dev libcurl4-gnutls-dev libtool
Copy a link to a CouchDB distro from https://www.apache.org/dyn/closer.cgi?path=/couchdb/1.2.1/apache-couchdb-1.2.1.tar.gz
cd /home/ubuntu/packages
wget {link to selected distro here}
tar -zxvf apache-couchdb-1.2.1.tar.gz
cd apache-couchdb-1.2.1
Configure and build:
./configure
make
sudo make install
At this point, change into the bin directory of couchdb and run sudo couchd. Go to http://localhost:5984/_utils to verify it is installed and running correctly.
Get geocouch
cd ~/packages
git clone -b couchdb1.2.x https://github.com/couchbase/geocouch.git
cd geocouch
Make geocouch
export COUCH_SRC=/home/ubuntu/packages/apache-couchdb-1.2.1/src/couchdb
make
Make sure it has built correctly. Change into the ebin and make sure there are a bunch of .beam files now there. Copy these files into the ebin for couchdb.
sudo cp /your/path/to/geocouch/ebin/* /usr/local/lib/couchdb/erlang/lib/couch-1.2.1/ebin
Place the geocouch config file into the correct location in the couchdb install
cp /your/path/to/geocouch/etc/couchdb/default.d/geocouch.ini/ usr/local/etc/couchdb/default.d
Add the geocouch test scripts to couchdb install
cp /your/path/to/geocouch/share/www/script/test/* /usr/local/share/couchdb/www/script/test
And then add the following to lines of code to the end of the list of LoadTest at the bottom of this file: /usr/local/share/couchdb/www/script/couch_test.js
loadTest("spatial.js");
loadTest("list_spatial.js");
loadTest("etags_spatial.js");
loadTest("multiple_spatial_rows.js");
loadTest("spatial_compaction.js");
loadTest("spatial_design_docs.js");
loadTest("spatial_bugfixes.js");
loadTest("spatial_merging.js");
loadTest("spatial_offsets.js");
Next test that GeoCouch is working with CouchDB, by creating a test document, and running a spatial query:
curl -X PUT http://127.0.0.1:5984/places
curl -X PUT -d '{"loc": [-122.270833, 37.804444]}' http://127.0.0.1:5984/places/oakland
curl -X PUT -d '{"loc": [10.898333, 48.371667]}' http://127.0.0.1:5984/places/augsburg
curl -X GET 'http://localhost:5984/places/_design/main/_spatial/points?bbox=0,0,180,90'
The bounding box request that you ran last should return the following:
@
{"update_seq":3,"rows":[
{"id":"augsburg","bbox":[10.898333,48.371667,10.898333,48.371667],"geometry":{"type":"Point","coordinates":[10.898333,48.371667]},"value":["augsburg",[10.898333,48.371667]]}
]}
@
Documents created by CouchDB are automatically dumped in /usr/local/var/lib/couchdb. The best way to deal with this situation it to create symbolic link to where want to store couchDB documents.
cd /usr/local/var/lib/couchdb
sudo su
ls
Make a copy of the couchDB documents directory into the couchdb directory you made earlier, and create a symbolic link.
mv * ~/couchdb
ln -s /usr/local/var/lib/couchdb/ /home/ubuntu/couchdb/
You then need to change the permissions on the CouchDB directory you created. First create a couchdb user and user group on the server.
useradd -d /usr/local/var/lib/couchdb couchdb
sudo usermod -G couchdb -a 'couchdb'
cd /home/ubunutu
sudo chown -R couchdb:couchdb couchdb/
You will need to create an admin account in couchdb; then create an export of an alias of this account+ server (so you don't have to keep typing it).
curl -X PUT http://127.0.0.1:5984/_config/admins/{your username here} -d '"{your password here}"' ""
CDB="http://{yourusernamehere}:{yourpasswordhere}@127.0.0.1:5984"
export CDB
You will also need to create 4 databases:
curl -X PUT $CDB/submissions
curl -X PUT $CDB/sources
curl -X PUT $CDB/derivatives
curl -X PUT $CDB/admin
You will later populate these databases with some InformaCam specific scripts.
Now install the back-end to the InformaCam System. This is housed on git. Install this in the interface directory you created.
cd ~/interface
git clone git@github.com:guardianproject/InformaCam-Server.git
You can always pull the latest version of the scripts from git.
cd ~/
git clone git@github.com:harlo/InformaCam-Server-Package.git
Move the contents of the git repo to their appropriate directories on your installation.
cp -R ClientUploads/ ~/interface/
cd scripts
cp -R * ~/scripts
cd ../
cp add_new_clients.sh
You also need to create some views for each of the databases you created in CouchDB.
cd  ~/scripts/couch
curl -X PUT -d @admin.json #CDB/admin/_design/admin
curl -X PUT -d @derivatives.json #CDB/derivatives/_design/derivatives
curl -X PUT -d @sources.json #CDB/sources/_design/sources
curl -X PUT -d @submissions.json #CDB/submissions/_design/submissions
And verify that your databases have been created
sudo ls ~/couchdb/couchdb
You will need to create a local constants file, in the following directory, and call it LocalConstants.java:
/home/ubuntu/interface/InformaCam-Server/src/main/java/org/witness/informa/utils/
Inside of the file, put the following:
@
package org.witness.informa.utils;
public class LocalConstants {
public final static String WEB_ROOT = "/home/ubuntu";
public final static String USERNAME = "couchDB user name here";
public final static String PASSWORD = "couchDB password here";
public final static String ENGINE_ROOT = "/home/ubuntu/engine/";
public static final Object SERVER_URL = "onion address here";
public static final String SUDOER = null; //if server needs login password enter it here otherwise leave null
public static final String SCRIPTS_ROOT = "/home/ubuntu/scripts";
public static final String CLIENT_TEMP = "/home/ubuntu/clients/temp/";
public static final String ORGANIZATION_NAME = "your_org_name_here";
public static final class ScriptsRoot {
public static final String PY = SCRIPTS_ROOT + "py/";
}
public static final String LOG_ROOT = "/home/ubuntu/log/application_server/";
public static final String ASSETS_ROOT = "where you want to store assets";
}
@
Tor has not yet assigned an onion address (you will add this to your constants later). But at this point the InformaCam Server should run:
cd ~/interface/InformaCam-Server
export PATH=$PATH:$M2
export PATH=$PATH:JAVA_HOME
mvn jetty:run
Got to {your instance's uRL}:8080/InformaCam-Server. You should see the InformaCam Server running at this point.
While the server is running, you still need to setup the hidden services, using Tor, for the full system to work.
cd ~/
cd synergy
mkdir ca
mkdir ClientUpload
The ClientUpload directory is the corresponding directory that exists at interface/ClientUpload. But you need to make sure only the Tor client can see this one, with permissions and adjusting the Tor settings:
sudo chown -R debian-tor:debian-tor ClientUpload/
sudo gedit /etc/tor/torrc
Scroll down to hidden services of the document and insert:
HiddenServiceDir /home/ubunutu/synergy/ClientUpload/
HiddenServicePort 443 127.0.0.1:443
You also need to setup the server to recognize something on port 443. First, open the php.ini file,
sudo gedit /etc/php5/cgi/php.ini
and add/uncomment the following:
cgi.fix_pathinfo =1
Next, you will need to open and update the lighttpd.conf file:
sudo gedit /etc/lighttpd/lighttpd.conf
Then skip to the end of the file, and add the following:
fastcgi.server = ( ".php" => ((
"bin-path" => "/usr/bin/php5-cgi",
"socket" => "/tmp/php.socket"
)))
Add the following to the end of the conf file and save and close:
$SERVER["socket"]=="localhost:443" {
ssl.engine="enable"
}
You will need to come back to this a little later and update the server information, once you have the certificates established.
You will now setup the default keys for the InformaCam system, and modify settings to have InformaCam act as a certification authority.
First, open the openssl.cnf file (located at /etc/ssl/). Modify the default to point to your server. Then create a manifest for your default right below. The configuration should look something like this:
@
####################################################################
[ ca ]
default_ca = InformaCamServer
#default_ca = CA_default
####################################################################
[InformaCamServer]
dir = /home/ubuntu/synergy/ca
database = $dir/index.txt
serial = $dir/serial
private_key = $dir/informacam.key
certificate = $dir/informacam.crt
default_days = 365
default_md = sha1
new_certs_dir = $dir/new_certs
policy = policy_match
@
Scroll down and change the following:
organizationalUnitName = match
Save and close. Then in InformaCam's certificate directory, create a directory for new certificates:
mkdir ~/synergy/ca/new_certs/
cd ~/synergy/ca
Make two files needed for the certificate authority to work:
sudo gedit ~/synergy/ca/serial
sudo gedit ~/synergy/ca/index.txt
Inside of the serial file put
01
on the first line. Add a line break and save and close. Leave index.txt blank and have and close.
Next, create a certificate for the InformaCam system:
cd ~/synergy/ca/
sudo openssl genrsa -out informacam.key
openssl req -new -key informacam.key -out informacam.csr
At the prompts, enter the appropriate information. Then sign:
sudo openSSL x509 -req -days 365 -in informacam.csr -signkey informacam.key -out informacam.crt
sudo openssl ca -gencrl -out /etc/ssl/private/informacam.crl -crldays 7
You also need a key and certificate for your web server.
cd ~/synergy/ca
sudo openssl genrsa -out synergy.key
sudo openssl req -new -key synergy.key -out synergy.csr
At the prompts enter the appropriate information. Then you need to sign the new key with the InformaCam certificate, and cat them into a pem file.
sudo openssl ca -in synergy.csr -cert informacam.crt -keyfile informacam.key -out synergy.crt
cat synergy.key synergy.crt > synergy.pem
Now that you have CA authority setup, update your lighttpd settings to include the following (the server name needs to be the name you set in the server certificate):
$SERVER["socket"]=="localhost:443" {
    ssl.engine="enable"
    server.document-root="/home/ubuntu/interface/ClientUpload"
    server.name="InformaCam Server"
    ssl.pemfile="/home/ubuntu/synergy/ca/synergy.pem"
    ssl.ca-file="/home/ubuntu/synergy/ca/informacam.crt"
    ssl.verifyclient.activate="enable"
    ssl.verifyclient.enforce="enable"
}
You now need to set your onion address. You will need to restart Tor and the web server for Tor to assign.
sudo /etc/init.d/tor restart
sudo /etc/init.d/lighttpd restart
sudo gedit ~/synergy/ClientUpload/hostname
Copy and paste the address in the hostname file once you have opened it. You need to add this address to the InformaCam java constants file (that you had setup earlier).
gedit /home/ubuntu/interface/InformaCam-Server/src/main/java/org/witness/informa/utils/LocalConstants.java
Copy and paste the onion address (including 'https://' in front of the address in the hostname file), into the following:
public static final Object SERVER_URL = "https://onion address here";
Then open the Tor browser, and try going to the onion address. You should see a series of errors that you are doing the right thing. First, in a javascript console, you should see that the connection was aborted. You should also be told that "This Connection is Untrusted," since this is a self-signed certificate. Accept and Confirm the security exception. After you have accepted and confirmed, you should see SSL handshake errors.
If you are seeing these errors above, you are on the right path. The computer connecting (i.e., the client) to InformaCam system, needs a certificate as well for the system to work. So, now you need to create a client certificate.
cd ~/clients
mkdir {name of client certificate is for}
cd {name of client certificate is for}
sudo openssl genrsa -des3 -out {name of client certificate is for}.key 1024
sudo openssl req -new -key {name of client certificate is for}.key -out {name of client certificate is for}.csr
At the prompts enter the appropriate information. Then you need to sign the new key with the synergy certificate, and cat them into a pem file.
sudo openssl ca -in {name of client certificate is for}.csr -cert synergy.crt -keyfile synergy.key -out {name of client certificate is for}.crt
cat {name of client certificate is for}.key {name of client certificate is for}.crt > {name of client certificate is for}.pem
The pem file you will give to the client, to store in the appropriate location on their system.
To make these scripts work you will need to update the constants.pi script to contain the accurate paths to the directories you have set on your system.
cd ~/scripts
gedit constants.pi
Save and close
At this point there are no administrators within the InformaCam server, so once you have updated the paths, you should run the following shortly after you have completed installation so a user can access the server:
./new_admin.py "display name here", "user name here", "password here"
This installation document assumes you are on Ubuntu, and that the base directory will be home/ubuntu. Make a directory that will house the packages you need to install, as well as a number of directories that will be used by the InformaCam system:
mkdir packages clients engine interface log scripts synergy
If this is a fresh install, remember to update your repositories.
sudo apt-get update
There are a few packages that you will need to assist you in the installation.
sudo-apt get install git
Once Git is installed, you will have to give this instance a key (or use an existing one). See these instructions on setting up an SSH key for Git:
https://help.github.com/articles/generating-ssh-keys
sudo apt-get install curl
You will need to install Oracle Java to run InformaCam Server, as CometD relies on this version of Java. It is recommended you install this version of Java before installing the other dependencies.
Note: InformaCam will be moving towards a standard Java version in future versions.
Follow the instructions provided here:
http://www.webupd8.org/2012/01/install-oracle-java-jdk-7-in-ubuntu-via.html
Make sure that Java version shows 1.7.0_10, and then update the variable to point to this version:
sudo gedit /etc/environment
Add/Update JAVA_HOME (double-check this path structure to make sure you have the correct path):
JAVA_HOME="usr/lib/jvm/java-7-oracle"
You need the latest version of Maven installed. The working stack of InformaCam is using Maven 3.0.4 at the moment. apache.org provides a list of distros:https://www.apache.org/dyn/closer.cgi/maven/maven-3/3.0.4/. Find a working one, and copy the link to the mirror you have selected.
Go to the packages directory you created and begin the install:
cd /home/ubuntu/packages
wget {link to selected distro here}
Make sure the tar is downloaded and copy the file name.
tar -xvzf {the tar file's name}
rm {the tar file's name}
sudo mkdir /usr/local/apache-maven
sudo cp -R apache-maven-3.0.4/* /usr/local/apache-maven
Then update/add the following to your environment variables:
M2_HOME="usr/local/apache-maven/apache-maven-3.0.4"
MAVEN_HOME="usr/local/apache-maven/apache-mave-3.0.4"
M
@
Also update the PATH to include /usr/local/apache-maven/apache-maven-3.0.4, and save and close.
Test that it points to the correct version, and remove old versions if necessary:
mvn -version
Install the latest version of CometD. The version used in the current working stack of InformaCam is 2.4.3. You can link to the tar's available at: http://cometd.org/documentation/building
Go to the packages directory you created and begin the install:
cd /home/ubuntu/packages
wget {link to selected distro here}
Make sure the tar downloaded and copy the file name.
unpack tar -xvzf {the tar file's name}
rm {the tar file's name}
cd cometd-2.4.3
Then install CometD into Maven; the following will skip the test scripts (process takes a while):
sudo mvn clean install -DskipTests=true
FFmpeg has branched. The official FFmpeg repo is incompatible with the requirements of InformaCam. So, you will need to use the FFmpeg branch available on git, here: https://github.com/FFmpeg/FFmpeg
cd /home/ubuntu/packages
git clone git@github.com:FFmpeg/FFmpeg.git
You need to build FFmpeg. You will need to install GCC (compiler for these packages) and some other packages that will help with build process. You also need the libx264 library:
sudo apt-get install gcc
sudo apt-get install build-essential
sudo apt-get install yasm
sudo apt-get install pkg-config
sudo apt-get install libx264-dev
Once these are installed (note: FFmpeg install takes a while):
cd FFmpeg
./configure
make
sudo make install
apt-get install ffmpeg2theora
Install lighttpd, and a dependency, php5-cgi
cd /home/ubuntu/packages
sudo apt-get install lighttpd
sudo apt-get install php-5cgi
To make sure lighttpd is installed, open a browser, and go to 127.0.0.1. You should see the lighttpd placeholder page. You will need to make some changes to lighttpd configuration, but you will need to complete the Tor installation first.
Install a stable version of Tor. You will need to add the correct repository, and add the correct gpg key before install.
sudo gedit /etc/sources.list
At the end of your sources.list add the following (the distribution for the current working stack of InformaCam is natty), and add the key:
deb http://deb.torproject.org/torproject.org <DISTRIBUTION> main
gpg --keyserver keys.gnupg.net --recv 886DDD89
gpg --export A3C4F0F979CAA22CDBA8F512EE8CBC9E886DDD89 | sudo apt-key add -
apt-get update
apt-get install deb.torproject.org-keyring
The key ring project installed above will make sure you have the most current signing key. Now install Tor.
apt-get install tor
CouchDB is the database used by the InformaCam system. It should be noted that the database itself does not contain sensitive information; it instead contains pointers to other files that do.
cd ~/
mkdir couchDB
sudo apt-get install couchdb
Documents created by CouchDB are automatically dumped in usr/var. The best way to deal with this situation it to create symbolic link to where want to store couchDB documents.
@
cd /usr/local/var
sudo su
cd couchdb
ls
@code
Copy the version number of CouchDB that was just installed, make a copy in the couchDB directory you made earlier, and create a symbolic link.
cd {past version # here}
mv *~/home/ubuntu/couchdb
ln -s /var/lib/couchdb/1.0.1/ /home/ubuntu/couchdb/
You then need to change the permissions on the CouchDB directory you created.
cd /home/ubunutu
chmod -R couchdb:couchdb couchdb/
You will need to create an admin account, and export an alias of this account+ server (so you don't have to keep typing it).
curl -X PUT http://127.0.0.1:5984/_config/admins/{your username here} -d '"{your password here}"' ""
CDB="http://{yourusernamehere}:{yourpasswordhere}@127.0.0.1:5984"
export CDB
You will also need to create 4 databases:
curl -X PUT $CDB/submissions
curl -X PUT $CDB/sources
curl -X PUT $CDB/derivatives
curl -X PUT $CDB/admin
You will later populate these databases with some InformaCam specific scripts.
Now install the back-end to the InformaCam System. This is housed on git. Install this in the interface directory you created.
cd ~/interface
git clone git@github.com:guardianproject/InformaCam-Server.git
You can always pull the latest version of the scripts from git.
cd ~/
git clone git@github.com:harlo/InformaCam-Server-Package.git
Move the contents of the git repo to their appropriate directories on your installation.
cp -R ClientUploads/ ~/interface/
cd scripts
cp -R * ~/scripts
cd ../
cp add_new_clients.sh
You also need to create some views for each of the databases you created in CouchDB.
cd  ~/scripts/couch
curl -X PUT -d @admin.json #CDB/admin/_design/admin
curl -X PUT -d @derivatives.json #CDB/derivatives/_design/derivatives
curl -X PUT -d @sources.json #CDB/sources/_design/sources
curl -X PUT -d @submissions.json #CDB/submissions/_design/submissions
And verify that your databases have been created
sudo ls ../../couchdb/
H2. Setup local constants.
You will need to create a local constants file, in the following directory, and call it LocalConstants.java:
/home/ubuntu/interface/InformaCam-Server/src/main/java/org/witness/informacam/utils/
Inside of the file, put the following:
@
package org.witness.informa.utils;
public class LocalConstants {
public final static String WEB_ROOT = "/home/ubuntu";
public final static String USERNAME = "couchDB user name here";
public final static String PASSWORD = "couchDB password here";
public static final Object SERVER_URL = "onion address here";
public static final String SUDOER = null; //if server needs login password enter it here otherwise leave null
public static final String SCRIPTS_ROOT = "/home/ubuntu/scripts";
public static final String CLIENT_TEMP = "/home/ubuntu/clients/temp/";
public static final String ORGANIZATION_NAME = "your_org_name_here";
public static final class ScriptsRoot {
public static final String PY = SCRIPTS_ROOT + "py/";
}
public static final String LOG_ROOT = "/home/ubuntu/log/application_server/";
}
@
Tor has not yet assigned an onion address (you will add this to your constants later). But at this point the InformaCam Server should run:
mvn run jetty
Got to {your instance's uRL}:8080/InformaCam-Server. You should see the InformaCam Server running at this point.
While the server is running, you still need to setup the hidden services, using Tor, for the full system to work.
cd ~/
cd synergy
mkdir ca
mkdir ClientUpload
The ClientUpload directory is the corresponding directory that exists at interface/ClientUpload. But you need to make sure only the Tor client can see this one, with permissions and adjusting the Tor settings:
sudo chown -R debian-tor:debian-tor ClientUpload/
sudo vi /etc/tor/torc
Scroll down to hidden services of the document and insert:
HiddenServiceDir /home/ubunutu/synergy/ClientUpload/
HiddenServicePort 443 127.0.0.1:443
You also need to setup the server to recognize something on port 443. First, open the php.ini file, and add/uncomment the following:
cgi.fix_pathinfo =1
Next, you will need to open and update the lighttpd.conf file located in home/ubuntu/etc/lighttpd. Add the following within the server.modules array:
"mod_fastcgi"
Then skip to the end of the file, and add the following:
fastcgi.server = (".php" => ((
    "bin-path"=>"/usr/bin/php5-cgi",
    "socket"=>"/tmp/php.socket"
)))
Add the following to the end of the conf file and save and close:
$SERVER["socket"]=="localhost:443" {
ssl.engine="enable"
}
You will need to come back to this a little later and update the server information, once you have the certificates established.
You will now setup the default keys for the InformaCam system, and modify settings to have InformaCam act as a certification authority.
First, open the openssl.cnf file (located at /etc/openssl/). Modify the default to point to your server. Then create a manifest for your default right below. The configuration should look something like this:
@
####################################################################
[ ca ]
default_ca = InformaCamServer
#default_ca = CA_default
####################################################################
[InformaCamServer]
dir = /home/ubuntu/synergy/ca
database = $dir/index.txt
serial = $dir/serial
private_key = $dir/informacam.key
certificate = $dir/informacam.crt
default_days = 365
default_md = sha1
new_certs_dir = $dir/new_certs
policy = policy_match
@
Scroll down and change the following:
organizationalUnitName = match
Save and close. Then in InformaCam's certificate directory, create a directory for new certificates:
mkdir ~/synergy/ca/new_certs/
Next, create a certificate for the InformaCam system:
cd ~/synergy/ca/
sudo openssl genrsa -out informacam.key
openssl req -new -key informacam.key -out informacam.csr
At the prompts, enter the appropriate information. Then sign:
sudo openSSL x509 -req -days 365 -in informacam.csr -signkey informacam.key -out informacam.crt
sudo openssl ca -gencrl -out /etc/ssl/private/informacam.crl -crldays 7
You also need a key and certificate for your web server.
cd ~/synergy/ca
sudo openssl genrsa -out synergy.key
sudo openssl req -new -key synergy.key -out synergy.csr
At the prompts enter the appropriate information. Then you need to sign the new key with the InformaCam certificate, and cat them into a pem file.
sudo openssl ca -in synergy.csr -cert informacam.crt -keyfile informacam.key -out synergy.crt
cat synergy.key synergy.crt > synergy.pem
Now that you have CA authority setup, update your lighttpd settings to include the following (the server name needs to be the name you set in the server certificate):
$SERVER["socket"]=="localhost:443" {
    ssl.engine="enable"
    server.document-root="/home/ubuntu/interface/ClientUpload"
    server.name="InformaCam Server"
    ssl.pemfile="/home/ubuntu/synergy/ca/synergy.pem"
    ssl.ca-file="/home/ubuntu/synergy/ca/informacam.crt"
    ssl.verifyclient.activate="enable"
    ssl.verifyclient.enforce="enable"
}
You now need to set your onion address. You will need to restart Tor and the web server for Tor to assign.
sudo /etc/init.d/tor restart
sudo /etc/init.d/lighttpd restart
cd ~/synergy/ClientUpload
sudo ls -la
sudo gedit hostname
You should see the debian-tor hostname and private_key file when you ls. Copy and paste the address in the hostname once you have opened it. You need to add this address to the InformaCam java constants file (that you had setup earlier).
gedit /home/ubuntu/interface/InformaCam-Server/src/main/java/org/witness/informacam/utils/LocalConstants.java
Copy and paste the onion address (including 'https://' in front of the address in the hostname file), into the following:
public static final Object SERVER_URL = "https://onion address here";
Then open the Tor browser, and try going to the onion address. You should see a series of errors that you are doing the right thing. First, in a javascript console, you should see that the connection was aborted. You should also be told that "This Connection is Untrusted," since this is a self-signed certificate. Accept and Confirm the security exception. After you have accepted and confirmed, you should see SSL handshake errors.
If you are seeing these errors above, you are on the right path. The computer connecting (i.e., the client) to InformaCam system, needs a certificate as well for the system to work. So, now you need to create a client certificate.
cd ~/clients
mkdir {name of client certificate is for}
cd {name of client certificate is for}
sudo openssl genrsa -des3 -out {name of client certificate is for}.key 1024
sudo openssl req -new -key {name of client certificate is for}.key -out {name of client certificate is for}.csr
At the prompts enter the appropriate information. Then you need to sign the new key with the synergy certificate, and cat them into a pem file.
sudo openssl ca -in {name of client certificate is for}.csr -cert synergy.crt -keyfile synergy.key -out {name of client certificate is for}.crt
cat {name of client certificate is for}.key {name of client certificate is for}.crt > {name of client certificate is for}.pem
The pem file you will give to the client, to store in the appropriate location on their system.
To make these scripts work you will need to update the constants.pi script to contain the accurate paths to the directories you have set on your system.
cd ~/scripts
gedit constants.pi
Save and close
Enabling “responsive” design on the InformaCam server, for video playback (the recommended method for best playback quality) does not fit within the current implementation of the front-end UX. The front-end is using the Sammy framework, and an initial capture of window size (at time of load) to calculate a controlled px size of all divs that are in the Sammy “tree”. This initial calculation of screen size, and its related tightly “controlled” pixel layout becomes important to accurately locate video and image annotations within their applicable image/video frames. Therefore, the InformaCam server / UX will not attempt responsive video playback, and will instead control for standard screen sizes; and serve up video that has been compressed into an appropriate standard size and which fits within the available screen space.
Referring to “Android Supported Media Formats” (see [https://developer.android.com/guide/appendix/media-formats.html]), the following supported file types should be considered, when Android devices are submitting video to InformaCam:Based on these file formats the following compression formats and/or related specification should be considered:
| File Format | Standard/Specification | Android Suggested Format | Notes |
| 3GPP | H.263 | ||
| MPEG-4 | H.264 | x | |
| MPEG-TS | MPEG-2 | ||
| WebM | H.264 | ||
| Matroska | Inherits from multiple including 3GPP, MPEG-4, MPEG-TS and WebM |
Based on these file formats the following compression formats and/or related specification should be considered:
| Incoming format | px* |
| 3GPP | |
| 128 X 96 | |
| 176 x 144 | |
| 352 x 288 | |
| 704 x 575 | |
| MPEG-4, WebM | RECOMMENDED ANDRODID FRAME SIZES; APPLY as DEFAULT |
| 176 x 144 | |
| 480 x 360 | |
| 1280 x 720 | |
| MPEG-TS | |
| 720 × 576 | |
| 720 × 480 | |
| 704 × 576 | |
| 704 × 480 | |
| 352 × 576 | |
| 352 × 480 | |
| 352 × 288 | |
| 352 × 240 | |
| Matraska | |
| Inherits from parent format, android supported above |
The ICTD file provides a means for an organization who wishes to receive InformaCam enhanced media, to create an easily distributed file that includes all the necessary information to contact and submit media in a secure manner. It also includes the ability to define organization specific form definitions using the Open Data Kit format.
ICTD files can be bundled in with InformaCam-based applications:
https://github.com/guardianproject/InformaApp/tree/master/app/assets/includedOrganizations
or they can be loaded at runtime through sending as an attachment, downloading from a secure website, or beaming via Bluetooth, among other standard data transfer mechanisms.
{"organizationName":"",
"repositories":
[{"asset_id":"","source":"","asset_root":""}],
"forms":[],
"publicKey":"",
"organizationFingerprint":"",
"organizationDetails":""}
{"organizationName":"InformaCam Testbed","repositories":[{"asset_id":"0B07iVinFhZgqa2tTZXhQdXNXYlk",
"source":"google_drive","asset_root":"https:\/\/drive.google.com"},{"asset_id":"6c393ca6-2e7b-4bcb-9b7a-e28a0a9b93e7","source":"globaleaks","asset_root":"http:\/\/jmsoty67uqopt3at.onion"}],"forms":["H4sIAClz6VEC\/51UsVLjMBCtna\/QqIErsJKjuX..."],
"publicKey":"H4sIAClz6VEC\/31Xxwr0Opbe+yn+5QzmtrNdHpiFcyr....",
"organizationFingerprint":"0E7804B31CCD9C1F179A32039CB5E4893246922E","organizationDetails":"Brooklyn, NY"}
Below is annotated version of the JSON data in a typical J3M bundle. You can view more actual J3M data through our public testbed at https://j3m.info
This represents where the file was original stored on the InformaCam app's encrypted internal storage. This will be rarely used, but could be helpful in extreme situations where inspection of the capture device is necessary:
{"asset_path": "submissions/45454ac1ade36ebec3749e8dc2aedc4b",
The Genealogy tag provides the basic data about the source of the media. "hashes" is an MD5 hash of all the pixel values of the image or video frames. "createdOnDevice" is the OpenPGP public key fingerprint for the user/app. "dateCreated" is a timestamp value for when the media capture occured.
"genealogy": {"localMediaPath": "/e61756a62a37535b77b0183318c79d26a2e0bdf0", "hashes": ["9230de4b067b2f14afcaa41d23b30a09"], "j3m_version": "J3M version 1.0", "createdOnDevice": >"694db2c3ecc07ac07f63e323f7b9a0cefada94cf", "dateCreated": 1386690725995},
file_name is the name of the J3M file as stored in the phone's internal memory
"file_name": "kxerFDrNCHiNOxawWUgYEbknbC.j3m",
public_hash is a SHA-1 cryptographic hash that combines the user's public key fingerprint and the MD5 media hash from above. This is used as the searchable public token identifier for the media file
"public_hash": "b840cbfd806865fff8cc34078540224cfe804ae5",
Intent represents the alias of the person who captured it, again their pgp key fingerprint, and who they meant to send this media file to, along with any record of it actually being transmitted. The "intendedDestination" information comes from any installed "trusted destination" or ICTD configuration files, that are stored in the app
"intent": {"alias": "ai whiteness", "ownershipType": 400, "pgpKeyFingerprint": "694db2c3ecc07ac07f63e323f7b9a0cefada94cf", "intendedDestination": "InformaCam Testbed"},
"date_admitted": 1386726920279.5662, "_id": "86ae352e68328c06de7840f4cb6be809",
The "data" section is where the sensor metadata logs are stored. It is an array if timestamped, sensorCapture items
"data": {
"sensorCapture": [
This is an orientation event, containing azimuth, pitch and roll, both in raw formats and "corrected" based on the orientation the user is holding their phone
{"timestamp": 1386690720753, "captureType": 271, "sensorPlayback": {"azimuthCorrected": -1.84727144241333, "pitchCorrected": 0.017154498025774956, "azimuth": 43.07861328125, "pitch": >-18.8385009765625, "roll": -132.7789306640625, "rollCorrected": -0.12050031125545502}},
This is a light meter value
{"timestamp": 1386690734267, "captureType": 271, "sensorPlayback": {"lightMeterValue": 13}},
This is a combined event with light meter and pressure data, both raw, and adjusted based on the phone's indicated local elevation
{"timestamp": 1386690729261, "captureType": 271, "sensorPlayback": {"pressureHPAOrMBAR": 1007.3463134765625, "lightMeterValue": 10, "pressureAltitude": 49.26783752441406}},
This is "visibleWifiNetworks" event capture displaying network names, frequency, strength and MAC address information
{"timestamp": 1386690729939, "captureType": 271, "sensorPlayback": {"visibleWifiNetworks": [{"bssid": "28:c6:8e:ba:ea:dc", "wifiFreq": 5220, "wifiLevel": -93, "bt_hash": >"afbf1e7ffc07f6b4471e34f8470f5fde947a8f2b", "ssid": "cloudcity5ghz"}, {"bssid": "1c:af:f7:d8:db:61", "wifiFreq": 2462, "wifiLevel": -88, "bt_hash": >"9c1cb7186bea393589ac3a591052f91da423205e", "ssid": "Cloud10"}, {"bssid": "28:c6:8e:ba:ea:da", "wifiFreq": 2437, "wifiLevel": -61, "bt_hash": "7b3b34fe541048f0e0800f1b788dc44cfdf6a59d", >"ssid": "cloudcity"},...
This is a GPS location event, display latitude, longitude and current accuracy of the sensor, based on whether it is coming from satellite, wifi, cell towers, etc.
{"timestamp": 1386690719706, "captureType": 271, "sensorPlayback": {"gps_coords": [-71.1253508, 42.3286856], "gps_accuracy": "32.119"}},
This is an accelerometer event, showing X,Y,Z motion data
{"timestamp": 1386690721758, "captureType": 271, "sensorPlayback": {"acc_z": 9.188077926635742, "acc_y": 2.7202823162078857, "acc_x": -1.9511220455169678}},
This is a telephony event, showing both any bluetooth devices noticed in the area, and information about the cellular network tower the smartphone is currently registered with. If the device is a wifi only device, or is not using a SIM card, this data will simply be omitted. The bluetooth device address does NOT display the name of the actual device MAC address, but instead shows a one-way hash value. This was an attempt to preserve some privacy for individuals who might be in the area. e
{"timestamp": 1386690719714, "captureType": 271, "sensorPlayback": {"bluetoothDeviceAddress": "5d9d203488950ff20c07b6dbfe9a8b8ddabafc6c", "LAC": "36493", "MCC": "310260", >"bluetoothDeviceName": "Nexus 4", "cellTowerId": "79211356"}},
After the sensor data, the J3M then shows basic "EXIF" style information from the capture device:
"exif": {"orientation": 0, "focalLength": -1, "timestamp": "2013:12:10 10:51:48", "make": "LGE", "flash": -1, "height": 960, "width": 1280, "iso": "100", "location": [-71.1250228881836, >42.32872772216797], "duration": 0, "model": "Nexus 4", "exposure": "0.033", "whiteBalance": -1, "aperture": "2.7"},
Finally, any user annotations, based on Open Data Kit forms provided as part of the "Trusted Destination" file, are shown here:
The form definition used is indicated, and a basic free text annotation is shown here:
"userAppendedData": [{"associatedForms": [{"path": "/forms/493dde68c49e6b99556186a3e776d705.xml", "namespace": "iWitness Free Text Annotations", "id": "234d025ee64976d27e1d2305f80824bc", >"answerData": {"iW_free_text": "watch out for icy sidewalks and roads"}}], "timestamp": 1386690794797, "id": "cdb7c22265121160dec5c0598263f58c"}, {"associatedForms": [{"path": >"/forms/493dde68c49e6b99556186a3e776d705.xml", "namespace": "iWitness Free Text Annotations", "id": "b63a2a65fc91dd9744d6cd5cea5cb28d", "answerData": {"iW_free_text": "this tree might >fall down"}},
If an annotation is placed at specific X,Y point in the image, or X,Y+time window for video, that information is also provided:
{"path": "/forms/46b9f8e70113ae0f39ae26338c0dc433.xml", "namespace": "iWitness v 1.0", "id": "fae0900eec13baefce4f98b895b80405",
"answerData": {"iW_individual_identifiers": "Victim"}}], "timestamp": 1386690798758, "regionBounds": {"top": 224, "displayLeft": 415, "height": 118, "width": -37, "displayWidth": 115, >"startTime": -1, "displayTop": 224, "displayHeight": 118, "endTime": -1, "left": 263}, "id": "1e9d35bed92b8fdfe46b251afb3227f2", "index": 0}, {"associatedForms": [{"path": >"/forms/493dde68c49e6b99556186a3e776d705.xml", "namespace": "iWitness Free Text Annotations", "id": "b63a2a65fc91dd9744d6cd5cea5cb28d", "answerData": {"iW_free_text": "this tree might >fall down"}}, {"path": "/forms/46b9f8e70113ae0f39ae26338c0dc433.xml", "namespace": "iWitness v 1.0", "id": "fae0900eec13baefce4f98b895b80405", "answerData": {"iW_individual_identifiers": >"Victim"}}], "timestamp": 1386690798758, "regionBounds": {"top": 224, "displayLeft": 415, "height": 118, "width": -37, "displayWidth": 115, "startTime": -1, "displayTop": 224, >"displayHeight": 118, "endTime": -1, "left": 263}, "id": "1e9d35bed92b8fdfe46b251afb3227f2", "index": 0}]}}
The J3M data collected by the mobile client should be as un-interpreted as possible. The Unveillance package should be responsible for interpreting and normalizing all data. Given that J3M data will be a bit "dirty" on input, please not the following when cleaning the data.
To easily translate values from JSON into our database, certain values must not be null, or NaN, but must be given impossible values that still adhere to the expected type. The following notes apply to specific values:
Using the 1xPad twitter application, trusted destination services may generate unique and statistically random upload tokens that may be used to authenticate media uploads.
Each Trusted Destination server runs a daemon that samples the Twitter firehose for a random array of tweets, which are used as One-Time Pads for authentication.
InformaCam, part of the SecureSmartCam suite of mobile apps, is a tool that allows users to embed expansive metadata into video or still images; encrypt media to trusted destinations using PGP; and securely upload media to trusted destinations using Tor. Our current work encompasses the following:
These modules are enumerated in our various Stack documents in this wiki.
Two additional critical components of the InformaCam system are the metadata formats we use for media and organizations:
This project is a collaboration between Witness, the International Bar Association, and Guardian Project. Other collaborators may attach themselves to the project at any time.
The InformaCam source is open and can be found on Github:
AndroidFedora Repository is a middleware application provides:
The XACML authorization is managed through Sun's Java classes that understand XACML. In summary, the XACML is an XML-based syntax, in which you write access/authorization policies and a requests to resources governed by these policies. When a request is made, the Java libraries read the request, refer to any written policies as the means to evaluate access rights to the requested resource. Sun's explanation can be found here: http://sunxacml.sourceforge.net/guide.html
Fedora's use of XACML assumes that authorization schema will be combined with some form of identity management that is enterprise in focus (e.g., Shibboleth, LDAP); and its default policy is 'public'. [still need deeper research to determine how this is applied to the API requests]
Notes:
benefits: not operating dependent. allows cross-operability between systems
similar to SELinix but abstracts it beyond OS
GLobal Leaks's project plan is moving its project towards a RESTful approach. However, from the documentation that is available, authorization does not appear to have been tackled yet in its API development. In addition, from the documentation available Global Leaks does not appear to be focused on creating a verifiable chain of custody, or encryption of requests/submissions. It would be worthwhile to have a conversation with Global Leaks developers, to find commonalities. But at this time, it does appear to still be too early in its development to be of relevance to InformaCam at the moment.
This would be similar to the Amazon Web services API approach.
1. requester combines all data into blob
2. Hash blob with private key know to server and client
3. send public key with blob + timestamp
4. receiver verifies time frame of request
5. look up public key to verify 'requestor' is registered
6. if both check out move forward with request
7. checksum blob with recreated blob using private key
8. if all good return requested data (and depending on level, requester then becomes receiver in a process for returned data)
Notes:
- need to flesh out the "Hash blob with private key know to server and client". Need to include an authorization key that is created and thrown out for each request.
- too heavy for large scale system?
This standard is quickly becoming "the" method for authorizing API requests. Seems really similar to rolling our own, but more specified. In addition, the focus is on securing the signature/requestor, but the request parameters itself are left unencoded, so would need to add custom encryption to the passed data on top of using this protocol [need to deeper research to determine if encrypted passed params are not also allowed]
- notes; OAuth can do the authentication. Data sent needs to be dealt with another way.
- Probably best way to manage API clients that we don't fully control
-
[research; how would SE Linux affect Fedora/other approaches?]
- could be used to create policies around specific applications
- e.g., set policy for how couchdb access is allowed on the complete os level
-
These functions should be modularized. Interaction between the modules should be REST based, to allow optimal flexibility and reuse of modules within different contexts. See API documentation for details on the REST calls.
The REST back-end will be python-based, with a Tornado web server/application, and a couchDB (?) database. There will be a hidden TOR service for file upload.
This module could accept various media types and files (i.e., would not have to be overly tied to the J3M as the metadata used for authentication), so this module could be re-purposed within any system needing a verifiable chain of custody. For example, this system could accept form data (separate from a media file), or an epub file that contained multiple media files, html/xml docs etc.
Notes:
The current setup directly uses J3M as part of the decryption. When you pass media, J3m is passed in encrypted blob. 1st thing it does it determine file type and look for J3M. It then decrypts the J3M.
Already currently starts a file based on keywords. This is before goes into database. Don't necessarily need entire J3m object stored. More suitable for J3m parts to be stored in flat files.
Submission record is created after going through J3Mifier
This will use Sammy to create a state-like app. It will use custom js to achieve pixel specific (non-responsive) placement of image and video regions. And it will support REST calls that break down user interactions to smaller data object transfers to the nonSQL db; as well as support access outside of the template provided.
Use of back-end based templating/ties to a back-end technology (e.g., python, CometD, etc.), will be avoided. This framework should be highly adaptable and be able to repurposed in a variety of formats.
Notes
For round one, security for the REST calls will rely on SSL certificates. The trusted destination will act as a certificate authority, and will grant "requesting" devices/systems a organization matching certificate. A requestor (device, system or browser) must have a corresponding browser certificate or server certificate for the REST call to be accepted.
In addition, a light-weight user login system will be developed with Python, to support user identification, for user interactions that are occurring. This should remain lightweight at the moment, and be easily replaced with institutional authentication systems if needed.
There is also an assumption that the trusted destination server will be hosted on an internal network, for this iteration of development. Special attention should be paid to the security of each of these modules. IPTables should be updated to drop connections from any known malicious IP addresses. Furthermore, certain modules, i.e. those accessible via hidden services, should only accept connections from Tor traffic, meaning all non-tor traffic should be dropped.
CouchDB views could also have individual admins, that are view and privilege specific.
Future iterations will consider and implement additional approaches to authentication and authorizations as needed, such as implementing OAuth for a public API, SE Linux for tightly controlled permissions between modules.
H2. Design Assumptions
The InformaCam stack consists of several modules, outlined thusly:
While we aim to support all Android devices, there are some that work better than others, and version so the Android OS that are more secure or feature-rich than others. This page provides the latest information regarding devices, OS versions and more.
The following devices are used as part of our active development process
Instructions for installing/building these applications can be found here.
Special attention should be paid to the security of each of these modules. IPTables should be updated to drop connections from any known malicious IP addresses. Furthermore, certain modules, i.e. those accessible via hidden services, should only accept connections from Tor traffic, meaning all non-tor traffic should be dropped.
Please have a look at our STRIDE Threat Model Document, created for our Phase I Report, June 18, 2012
A fairly consistent set of standards have emerged in from the digital repository and archives fields, establishing best practices for a "trusted" digital repository. These standards are used to audit a digital repository and/or give it a seal of approval; deeming it a repository in which the integrity and authenticity of the digital files within can be trusted. As the InformaCam system moves from a research prototype, into a next phase of development, it is useful to evaluate the InformaCam system against these practices (serving somewhat as a first step of an internal audit), as a means of identifying strengths, weaknesses, and areas for further development of the server side of the InformaCam system.
It should be noted, that the concept of "trusted" that is applied in these standards has many overlaps with the risks and assessments that must also be considered within the digital security field that InformaCam more aptly belongs, but they are not equivalent. In certain areas, InformaCam's interpretation of the guidelines and practices will likely be far more exacting than other institutions have implemented and will need alternative auditing criteria. It should also be noted that InformaCam System is still only a research implementation, so many of the standards are not applicable in the immediate. Instead this audit serves more as means to define future guideposts of development.
TRAC, a set of criteria and a checklist that have become the ISO 16363 standard, was chosen as the standard to evaluate InformaCam in this document, because of its broader applicability, and the possibility of an applicable external audit.
Jump to Final Conclusions at the end of this document to read the findings of this internal audit.
These practices/initiatives consider OAIS, developed by NASA, as the starting framework for the design and implementation of a digital repository (i.e., the organization of people, as well as the software applications used to support storage practices, and the terminology that is applied). However, the initiatives/standards listed above attempt to go beyond abstraction, and define actual practices that should be in place to be a "trusted" digital repository. There are a number of research-based digital repositories that implement these practices.
Trac defines a trusted digital repository as:
'a trusted, “long-term digital repository is a complex and interrelated system” (nestor 2006). However, more than just the “digital preservation system” drives the management of the digital materials. In determining trustworthiness, one must look at the entire system in which the digital information is managed...A trusted digital repository will understand threats to and risks within its systems...these potential threats include media failure, hardware failure, software failure, communication errors, failure of network services, media and hardware obsolescence, software obsolescence, operator error, natural disaster, external attack, internal attack, economic failure, and organizational failure"
The standards for certification of trusted digital repositories are broken into the following areas:| Criteria | Met? | Current Application | Proposed Next Steps | Next Phase Priority |
|---|---|---|---|---|
| A1.1. Repository has a mission statement that reflects a commitment to the long-term retention of, management of, and access to digital information. |
? | In statement of work? | Guardian Project should require each client to define mission before an installation if the guardian maintains some level of responsibility | Medium |
| A1.2. Repository has an appropriate, formal succession plan, contingency plans, and/or escrow arrangements in place in case the repository ceases to operate or the governing or funding institution | No | Not met | Option 1. Push responsibility onto Witness; Option 2. Roll into "social business plan" | Urgent |
| A2.1. Repository has identified and established the duties that it needs to perform and has appointed staff with adequate skills and experience to fulfill these duties. | No | The focus (appropriately) has been on development of the software, not on servicing it | A definition of the service, and then a clearly defined breakdown of responsibilities between organizations needs to be defined | High |
| A2.2. Repository has the appropriate number of staff to support all functions and services. | No | See A2.1 | See A2.1 | Medium |
| A2.3. Repository has an active professional development program in place that provides staff with skills and expertise development opportunities. | Yes | Guardian Project develops with as-needed-consultant basis. Skills are pulled from various areas. | current guardian developers are making themselves familiar with the code base | Low |
| A3.1. Repository has defined its designated community(ies) and associated knowledge base(s) and has publicly accessible definitions and policies in place to dictate how its preservation service requirements will be met. | Partially | Tutorials, and How-to-steps have been written for software. Preservation specific knowledgebase has not been completed | Finish documentation to include preservation definitions | Low |
| A3.2. Repository has procedures and policies in place, and mechanisms for their review, update, and development as the repository grows and as technology and community practice evolve. | Not met | Not met | Make part of SLA development, include development of technology maintenance | Low |
| A3.3. Repository maintains written policies that specify the nature of any legal permissions required to preserve digital content over time, and repository can demonstrate that these permissions have been acquired when needed. | No | Not met | Create a terms of agreement for users installing InformaCam system before they can use | High |
| A3.4. Repository is committed to formal, periodic review and assessment to ensure responsiveness to technological developments and evolving requirements. | Yes | Steps to conduct internal audit; discussions and acknowledgement of need for external audit; phase reviews; direct contact with users with requirements gathering being conducted at beginning of next phase | Medium | |
| A3.5. Repository has policies and procedures to ensure that feedback from producers and users is sought and addressed over time. | Met | See A3.4 | See A3.4 | Medium |
| A3.6. Repository has a documented history of the changes to its operations, procedures, software, and hardware that, where appropriate, is linked to relevant preservation strategies and describes potential effects on preserving digital content. |
No | Not met | Make part of SLA development | Medium |
| A3.7. Repository commits to transparency and accountability in all actions supporting the operation and management of the repository, especially those that affect the preservation of digital content over time. | Partial | As open source project, and as a grant reporting project, transparency has been maintained | These need to be formally documented in relation to repository practices | low |
| A3.8 Repository commits to defining, collecting, tracking, and providing, on demand, its information integrity measurements. | No | Not met | Need to better define how the system will long actor + actions taken on the storage application; define how the system will routinely conduct checksum and bit corrosion checks; define better how the server side will maintain user identity to all actions | High |
| A3.9 Repository commits to a regular schedule of self-assessment and certification and, if certified, commits to notifying certifying bodies of operational changes that will change or nullify its certification status. | Not met | With the project in research stage this is not currently a priority. Initial steps are being taken now | Low | |
| A4.1. Repository has short- and long-term business planning processes in place to sustain the repository over time. | No | Not met | Discussions have begun.; but clear funding needs, goals and action plans are not yet established | Urgent |
| A4.2. Repository has in place processes to review and adjust business plans at least annually. | No | Not met | Make part of SLA development work | Low |
| A4.3. Repository’s financial practices and procedures are transparent, compliant with relevant accounting standards and practices, and audited by third parties in accordance with territorial legal requirements. | Yes | All funding requirements are being met with the funding agencies. | N/A | Met |
| A4.4. Repository has ongoing commitment to analyze and report on risk, benefit, investment, and expenditure (including assets, licenses, and liabilities). | Met | See A4.3 | See A4.3 | |
| A4.5. Repository commits to monitoring for and bridging gaps in funding. | Not Met | While meeting requirements and software development has been met, the funding to provide the service of a repository has not yet been fully evaluated and covered | Make part of the SLA development; seek additional funders and partners (e.g., E.U., U.N., continue with IBA, etc.), or pay-for-service model instead of grant funding | Urgent |
| A5.1 If repository manages, preserves, and/or provides access to digital materials on behalf of another organization, it has and maintains appropriate contracts or deposit agreements. | No | Not met | Make part of SLA Development | Urgent |
| A5.2 Repository contracts or deposit agreements must specify and transfer all necessary preservation rights, and those rights transferred must be documented. | No | Not met | Make part of SLA development | Urgent |
| A5.3 Repository has specified all appropriate aspects of acquisition, maintenance, access, and withdrawal in written agreements with depositors and other relevant parties. | No | Not met | Make part of SLA development; delineate responsible parties | Medium |
| A5.4 Repository tracks and manages intellectual property rights and restrictions on use of repository content as required by deposit agreement, contract, or license. | No | Not met | Make part of SLA development; add appropriate data requirements to metadata schema; delineate responsible parties | High |
| A5.5 If repository ingests digital content with unclear ownership/rights, policies are in place to address liability and challenges to those rights. | No | Not met | See A5.4 | High |
While some of the criteria in this section will not directly influence this next phase of software development, there are some items that have an urgency to them. At this time, InformaCam resides in a nebulous space, in which the Guardian Project develops and maintains a research implementation that clients may access to review the stage and usability of the product. However, as a "trusted" digital repository, it becomes important to clearly delineate the responsibilities that the Guardian Project is taking on, the legalities of ownership of media submitted to system, and the funding sources for these responsibilities before accepting any "true" submissions into an implementation. Therefore, it is recommended that the development of an SLA begins now; and appropriate long-term funding paths be identified (whether that is as a social entrepreneurship or through further non-profit funding sources, or that responsibility will be fully assumed by other organizations); as this is work that involves significant lag time to accomplish.
This work should not be considered an obstacle to development. Instead, the urgency should be more understood in relationship to 1) ensuring that the expenses involved in appropriately maintaining a trusted repository can be met, and 2) the related societal expense that would result if media submitted to the repository was deemed not worthy as court admissible evidence due to the results of up-and-down funding, multiple migrations, undefined responsibilities, etc.
| Criteria | Met? | Current Application | Proposed Next Steps | Next Phase Priority |
|---|---|---|---|---|
| B1.1. Repository identifies properties it will preserve for digital objects. | Yes | see J3M spec | review mets and Witness metadata schema to incorporate any other additional requirements | High |
| B1.2. Repository clearly specifies the information that needs to be associated with digital material at the time of its deposit(i.e., SIP). | Yes | See B1.1 | Low | |
| B1.3. Repository has mechanisms to authenticate the source of all materials. | Yes | Chain of Custody functionality | Document process and test | High |
| B1.4. Repository’s ingest process verifies each submitted object (i.e., SIP) for completeness and correctness as specified in | ? | J3M is applied; but what does this mean interms of "archival" requirements | see B1.1 | Medium |
| B1.5. Repository obtains sufficient physical control over the digital objects to preserve them (Ingest: content acquisition). | ? | this falls into service level which is not yet defined | include in SLA development | High |
| B1.6. Repository provides producer/depositor with appropriate responses at predefined points during the ingest processes. | Partial | This system is fairly well developed on mobile to server; but admin work and review of completion of submit, etc. is not fully developed yet | Identify strong use cases and develop | Medium |
| B1.7. Repository can demonstrate when preservation responsibility is formally accepted for the contents of the submitted data objects (i.e., SIPs). | Partial | See B1.6 | See B1.6 | Medium |
| B1.8. Repository has contemporaneous records of actions and administration processes that are relevant to preservation. | No | Not met | review with UT, IBA and Witness current practices; determine next steps for implementing | Low |
| B2.1. Repository has an identifiable, written definition for each AIP or class of information preserved by the repository. | Partial | see B1.1. | low | |
| B2.2. Repository has a definition of each AIP (or class) that is adequate to fit longterm preservation needs. | No | Not met | See B1.1 | Low |
| B2.3. Repository has a description of how AIPs are constructed from SIPs | No | Not met | See B1.1 | Low |
| B2.4. Repository can demonstrate that all submitted objects (i.e., SIPs) are either accepted as whole or part of an eventual archival object (i.e., AIP), or otherwise disposed of in a recorded fashion. | No | Not met | See B1.1 | Low |
| B2.5. Repository has and uses a naming convention that generates visible, persistent, unique identifiers for all archived objects (i.e., AIPs). | Yes | See B1.1 | See B1.1 | Low |
| B2.6. If unique identifiers are associated with SIPs before ingest, the repository preserves the identifiers in a way that maintains a persistent association with the resultant archived object (e.g., AIP). | Yes | See B1.1 | See B1.1 | Low |
| B2.7. Repository demonstrates that it has access to necessary tools and resources to establish authoritative semantic or technical context of the digital objects it contains (i.e., access to appropriate international Representation Information and format registries). |
No | Since this is still a research implementation not applicable | Needs to be considered when developing SLA | High |
| B2.8 Repository records/registers Representation Information (including formats) ingested. | Yes | See B1.1 | See B1.1 | Low |
| B2.9 Repository acquires preservation metadata (i.e., PDI) for its associated Content Information. | Yes | See B1.1 | See B1.1 | Low |
| B2.10 Repository has a documented process for testing understandability of the information content and bringing the information content up to the agreed level of understandability. | No | J3M is well documented, well defined schema, but not yet tested in a broader community | Usability testing with IBA groups + find potential peer groups to review J3M | Low |
| B2.11 Repository verifies each AIP for completeness and correctness at the point it is generated. | ? | Chain of custody is established, and initial capture is defined, but full AIP requirements needed to be fleshed out, and system needs to automate the verification process | Medium | |
| B2.12 Repository provides an independent mechanism for audit of the integrity of the repository collection/content. | No | This is still research implementation so not applicable | Performing internal TRAC audit as first step; meeting with UT to determine applicable standards; will build in necessary features this round | High |
| B2.13 Repository has contemporaneous records of actions and administration processes that are relevant to preservation (AIP creation). | No | See B2.12 | See B2.12 | High |
| B3.1. Repository has documented preservation strategies. | No | See B2.12 | See B2.12 | Medium |
| B3.2. Repository has mechanisms in place for monitoring and notification when Representation Information (including formats) approaches obsolescence or is no longer viable. | see B2.12 | See B2.12 + will include create of an "archive" master at time representations are created | High | |
| B3.3 Repository has mechanisms to change its preservation plans as a result of its monitoring activities. | Partial | InformaCam is an entirely open-source system, and any changes required would be at the discretion of a group implementing it. | Need to more deeply consider the malleability of current stack around the creation of the media representations, and the metadata schema | Medium |
| B3.4. Repository can provide evidence of the effectiveness of its preservation planning. | No | See B2.12 | See B2.12 | Medium |
| B4.1. Repository employs documented preservation strategies. | No | See B2.12 | See B2.12 | Medium |
| B4.2. Repository implements/responds to strategies for archival object (i.e., AIP) storage and migration. | No | See B2.12 | See B2.12 | Medium |
| B4.3 Repository preserves the Content Information of archival objects (i.e., AIPs). | Partial | See B2.12 | See B2.12 | Medium |
| B4.4 Repository actively monitors integrity of archival objects (i.e., AIPs). | No | See B2.12 | See B2.12 | High |
| B4.5 Repository has contemporaneous records of actions and administration processes that are relevant to preservation (Archival Storage). | No | See B2.12 | See B2.12 | High |
| B5.1 Repository articulates minimum metadata requirements to enable the designated community to discover and identify material of interest. | Yes | research implementation of search feature has been implemented | Refine geo search; fill out catalog for better testing; refine search results | Medium |
| B5.2 Repository captures or creates minimum descriptive metadata and ensures that it is associated with the archived object (i.e., AIP). | Yes | J3M is well defined, well documented metadataschema currently implemented | see B2.12 | Low |
| B5.3 Repository can demonstrate that referential integrity is created between all archived objects (i.e., AIPs) and associated descriptive information. | Partial | Representations that | See B2.12. Will more deeply consider longer life cycles for media in repository and other "representations" that will be created | Medium |
| B5.4 Repository can demonstrate that referential integrity is maintained between all archived objects (i.e., AIPs) and associated descriptive information. | Partial | see B5.3 | See B5.3 | Medium |
| B6.1 Repository documents and communicates to its designated community what access and delivery options are available. | Partial | Help documentation has been written; some admin features exist | Documentation needs to be refined to reflect preservation practices decided on + admin features need to be built out to support full life cycle of media | Medium-High |
| B6.2 Repository has implemented a policy for recording all access actions (includes requests, orders etc.) that meet the requirements of the repository and information producers/depositors. | No | See B2.12 | See B2.12 | Low |
| B6.3 Repository ensures that agreements applicable to access conditions are adhered to. | No | As research implementation not applicable | See B2.12 | High |
| B6.4 Repository has documented and implemented access policies (authorization rules, authentication requirements) consistent with deposit agreements for stored objects. | No | users submitting to system must have registered cert with system; though installation of app is open/uncertain of rules and authentication is applied as full open source app | See B6.3 | High |
| B6.5 Repository access management system fully implements access policy. | No | See B6.4 | High | |
| B6.6 Repository logs all access management failures, and staff review inappropriate “access denial” incidents. | No | Research implementation, so not yet developed | Need to implement a more robust log system for all activities | High |
| B6.7 Repository can demonstrate that the process that generates the requested digital object(s) (i.e., DIP) is completed in relation to the request. | Partial | Chain of custody is currently maintained | Need to implement an more robust log system for all activities | High |
| B6.8 Repository can demonstrate that the process that generates the requested digital object(s) (i.e., DIP) is correct in relation to the request. | No | See B6.7 | See B6.7 | High |
| B6.9 Repository demonstrates that all access requests result in a response of acceptance or rejection. | Partial | see B6.7 | see B6.7 | High |
| B6.10 Repository enables the dissemination of authentic copies of the orig | No | Focus is on sharing the representations | Full life cycle and admin features still need to be defined and developed | Medium |
Much of this section is related to the metadata that is associated with submitted media. The J3M schema is a great start, and it has already been identified that METs and other archival metadata could be wrapped around the J3M at time of submission. The next phase would include some work to review and incorporate any additional metadata that is determined useful/necessary. In addition, the server-side schema should be fleshed out more to maintain relationships between representations of an original, and their corresponding metadata and any related technical documentation.
However, it is also important to more clearly define who the "designated" communities are, and what their acceptable "access" levels will be. While a PEM file is created for any user submitting media, user authentication through the web admin interface is not tied to this. Varying permission levels are not associated with the various user actions. Certain user actions that can be performed on an object are not appropriately tied to a corresponding user identity. Searchable/readily useable logs of all system actions do not exist. And formal "preservation strategies" still need to be defined before the system can accept responsibility for media.
| Criteria | Met? | Current Application | Proposed Next Steps | Next Phase Priority |
|---|---|---|---|---|
| C1.1 Repository functions on well-supported operating systems and other core infrastructural software. | Partial | Technologies chosen for the informacam stack are strong; however, as a research implementation a full community for "informaCam" needs to be developed | identify existing open-source communities that would have an interest in technology; promote informacam | Medium |
| C1.2 Repository ensures that it has adequate hardware and software support for backup functionality sufficient for the repository’s services and for the data held, e.g., metadata associated with access controls, repository main content. | No | Research implementation/ not applicable yet | See A2.1 | High |
| C1.3 Repository manages the number and location of copies of all digital objects. | Partial | See B5.3 | See B5.3 | Medium |
| C1.4 Repository has mechanisms in place to ensure any/multiple copies of digital objects are synchronized. | Partial | See B5.3 | See B5.3 | Medium |
| C1.5 Repository has effective mechanisms to detect bit corruption or loss. | No | As research implementation not yet established | Meet with UT; identify other repo apps approach to this; build out | High |
| C1.6 Repository reports to its administration all incidents of data corruption or loss, and steps taken to repair/replace corrupt or lost data. | No | See C1.5 | C1.5 | |
| C1.7 Repository has defined processes for storage media and/or hardware change (e.g., refreshing, migration). | No | see B2.12 | see B2.12 | Medium |
| C1.8 Repository has a documented change management process that identifies changes to critical processes that potentially affect the repository’s ability to comply with its mandatory responsibilities. | No | See B2.12 | See B2.12 | Medium |
| C1.9 Repository has a process for testing the effect of critical changes to the system. | No | As research implementation, not applicable | Can include in review of current witness practices, etc. | Low |
| C1.10 Repository has a process to react to the availability of new software security updates based on a risk-benefit assessment. | No | Currently building out a chef recipe for automated builds | create a build process that will enable for more rapid, and recordable updates of system when security updates become available. (is chef too time consuming to maintain; will software patches + upgrades realistically get updated in chef file ??) | High |
| C2.1 Repository has hardware technologies appropriate to the services it provides to its designated communities and has procedures in place to receive and monitor notifications, and evaluate when hardware technology changes are needed. | Partial | Technologies selected are appropriate for research implementation | Formal notification practices need to be established once service ownership is also established | Low |
| C2.2 Repository has software technologies appropriate to the services it provides to its designated community(ies) and has procedures in place to receive and monitor notifications, and evaluate when software | Partial | Technologies selected are appropriate for long-term implementations (Java version will be revised/dependence on Matlab is being removed | See C2.1 | Medium |
| C3.1 Repository maintains a systematic analysis of such factors as data, systems, personnel, physical plant, and security needs. | No | Not applicable as a research implementation | Include this in development of SLA | High |
| C3.2 Repository has implemented controls to adequately address each of the defined security needs. | No | See C3.1 | See C3.1 | High |
| C3.3 Repository staff have delineated roles, responsibilities, and authorizations related to implementing changes within the system. | No | See A2.1 | See A2.1 | Medium |
| C3.4 Repository has suitable written disaster preparedness and recovery plan(s), including at least one off-site backup of all preserved information together with an offsite copy of the recovery plan(s). | No | As research implementation, not applicable | Make part of SLA development | Urgent |
Security of the media and its corresponding chain of custody is a strength of the InformaCam research implementation. So, it makes sense that many of the weaknesses identified in this section actually correspond to the criteria that must be addressed as urgent in the Organizational Infrastructure. For example, it is urgent that back-up systems be in place before InformaCam begin accepting responsibility for media; however, the full responsibility and funding for this work still needs to be defined.
However, there are some items that directly relate to software development in this next phase as well. As identified in the previous section, searchable/readily useable logs of all system actions needs to be developed. Synchronization between representations and original media submissions needs to be accurately maintained. Dependence on non-standard Java and on Matlab needs to be phased out. And automated bitsum checks and bit corrosion checks needs to be created.
Overall, the InformaCam system is heading in an appropriate direction. Many of the priorities that have been identified are natural steps within a system that is evolving towards service quality. However, out of this internal audit, the following items should be considered for development in this next phase, either to ensure the system is being developed in way that it can verify data integrity using industry standards, or to ensure the appropriate resources are dedicated to ensure full responsibility for court-admissible evidence is maintained:
Long-term funding for the digital repository services must be defined. This could be as a social venture, it could be to continue to maintain strong relationships with non-profit granting agencies, it could be to develop deep partnerships with viable organizations, or it could be some combination of these three. Potential partner organizations could be for-profit (e.g., Google), governments (e.g., E.U.), or research institutions with leading and committed digital repository programs (e.g., Yale, Cambridge, UC Berkeley, etc.)
The J3M metadata schema was not been designed against METS or other digital repository schema systems. This is not a shortcoming, since the schema is appropriate for its location/purpose. However, work must be done during this phase to identify a path to integrate incoming J3M metadata with METS, as well as some other metadata standards that have been identified as already in use (e.g, the schema developed with UT and Witness).
In addition, a more robust and malleable means for maintaining relationships (and their associated metadata) between representations and the originating media submission, needs to be developed/incorporated within this server-side metadata schema.
Formal preservation practices for the video and images accepted to InformaCam should be established. Video and digital image preservation is a fairly well established field at this point, and several leading organizations (e.g., Library of Congress, etc.) have published standards that be readily adopted. However, once standards are selected, some software changes will also be necessary to implement (e.g., if the best practice preservation format for images is considered to be TIFF, the InformaCam Server will create this format at time of ingest, as well as the web-ready representations, etc.).
In addition, a system to automate checksum and bit corrosions checks needs to be developed.
The permissions/authentication on the server side needs to be enhanced to better support more granular levels of access. E.g., view privileges of a media submissions, vs. annotation rights, vs. download of original, etc. This granular levels of access also need to be recorded within the evidence logs. In addition, if this phase of development will also include the creation of feeds/sharing with more "public" community, the software will also need to be enhanced to maintain distinctions between the "vault" containing the originating media, and a front-end that many, varying users could be hitting with a public URL/access point.
Trusted Destinations are installed onto the device by obtaining an .ictd file and opening it in the app. The ICTD file is unique to each organization and contains the information required by the user to successfully send data to the destination.
The manifest is a JSON-formatted document, containing the following:
{
    "organizationName":"Trusted Destination Name",
    "organizationDetails":"London, UK",
    "repositories":[
        {
            "source":"google_drive",
            "asset_root":"ID of the folder in which we drop media"
        }
    ],
    "forms:[
        "Base-64 encoded, GZipped, xml form data (javarosa/open data kit compliant)"
    ],
    "publicKey": "Base-64 encoded, GZipped public key block",
    "organizationFingerprint":"PGP FINGERPRINT"
}
View an example here: http://ec2-54-235-36-217.compute-1.amazonaws.com/informacam/
When the user finishes creating an image or video in InformaCam, it automatically uploads to the chosen trusted destinations. This document explains that process.
Upon saving an image or video, the device will generate a random public/private keypair that encrypts the metadata. This key can be used only by the device to access a source image's metadata. When the user is connected to the internet, the upload process begins.
For each selected trusted destination, the device must request an upload ticket. This transaction is carried out via the trusted destination's hidden service address (which is held in the device's encrypted database.)
For each upload, the Trusted Destination's server will generate an upload ticket containing a one-time-use password to encrypt the image/video. The device must then re-encrypt the metadata bundle with this password using AES encryption. Once the media is stored on the Trusted Destination's server, the media's metadata can only be decrypted with this password.
Upon request, the device must submit the following data:In response, (if approved) the server generates a one-time-use authentication token to the device to initiate upload. The server creates a unique, one-time-use user for this upload, and adds the user's unique ID to a queue of uploads to collect and then move to the main media repository upon successful upload. (This user ID is to be deactivated and removed upon successful upload.)
After receiving the authentication token, the user transmits the media via SSH over Tor via a background service on the app. Once the number of bytes declared in step 1 have been transmitted, the server must validate the hash of both the unredacted and redacted data to verify that the media received is the same as the media uploaded. Successful verification triggers a response to the user's device that the media has been accepted and stored by the trusted destination.
Once the image or video has been successfully transmitted, the InformaCam-generated PGP key of the device is logged. If the administrator acting on behalf of the trusted destination desires to get in contact with the user, connection may be initiated via this key.
Please Note: This new binary is not backwards-compatible. You will have to uninstall InformaCam from your device before using this one.
Please download APK here
(older binaries)
or build from source
(notes for building from source are here: Build InformaCam from Source).
The APK is prototype, and as such, will be updated and replaced from time-to-time. You will be notified to re-install when there is a new version available. This also means that this build should not be considered for use outside of testing and demo-ing purposes, as the app will have to go through a thorough peer-review and quality assurance testing before it can be reliably used "in the wild."
InformaCam requires a devices running Android 2.3.3 or later.
So far, InformaCam has been successfully tested on the following devices:If you experience difficulty with InformaCam, and your device is not listed above, please contact us with your device model. We will investigate.
To properly use the backend interface, you must navigate through it using the Tor Browser Bundle, in place of a standard browser like Firefox, Chrome, or IE.
Update
You may now use Firefox or Chrome to access the backend. Has not been tested on IE.
InformaCam has a handy wizard that guides you through set-up, step by step. When you're finished with the wizard, the first thing you'll want to do is to get the proper credentials to send your media to a trusted destination server. From the main menu, tap "Export Device Key" and send it to the administrator of the trusted destination server. (You may send this by email, bluetooth, dropbox, it's up to you.) When the administrator sends you back your .ictd file, simply open it with InformaCam and it will be automatically imported into your Address Book.


From the main menu, select either Camera or Camcorder to launch the camera. Once you're done taking your image or video, click "Save" (or the check icon, depending on your device.) After a moment, an editor should appear where you can tap on a region in the video or photo to make annotations. If you don't want to annotate your media immediately, press the menu button and select "Save;" your image or video will be saved in its current state and can be re-opened at any time via the Media Manager.


From the Media Manager, you will see a list of all your InformaCam media, including the time last saved, and media type (image or video). Tap on any item to resume editing, or long-press to rename the file, delete the file, or export it via email, bluetooth, or any other app you have on your device.


There is a difference between the "Save" option, the "Save and Send" option (both found in the media editor) and the "Export" option (found in the Media Manager) which must be understood to use InformaCam effectively. A media file's chain of custody depends on the option you choose:


Once a media file has been received, you will receive confirmation in your Message Center. You may think of this as somewhat of a chat room between a trusted destination and yourself, where the topic of conversation is the media file you sent out. InformaCam will refresh your messages as long as you are connected to the internet, and are running Orbot (Tor) in the background.
If you receive an error message, or if the app quits unexpectedly, please relaunch the app (if possible) and select "Send Log..." from the main menu. A dialog will appear that you must "OK" to generate the log. Once completed, you will be prompted to choose how you'll share the log with us. While email is acceptable, we would prefer you use Dropbox to place your error log into the "InformaCam Error Reporting" folder. (As a beta tester, you should have been granted access to this Dropbox folder; if not, please email harlo@guardianproject.info for access.)
The sooner you do this after an error, the better, as it will help the InformaCam team better tailor your experience.


Once logged into the InformaCam server, you can view submissions by clicking on the Submissions tab (1). A list showing all submissions should appear (2); clicking on one will load the image (3).

One of the first visualization features available is the Map view, which gives a complete location history of the media object. InformaCam logs and displays the location where the media was saved, any locations encountered while the user was editing (or annotating) the media, as well as any locations visited during media capture (in the case of video).

Clicking on the Search tab (1) brings you to the place where you can search your collections according to various parameters. Each member on your team can create custom searches that can be loaded and performed right from the search tab (2). Naturally, a user can save a search query if a search is successful (3, 4).

Regions of interest (annotations) submitted by the user are highlighted in grey over the media itself. Clicking on any region (1) will bring up the annotations box. Think of the annotations as a chat room dedicated to a particular region of interest. In addition to the original annotations by the source, you and anyone on your team can add annotations to further the discussion to the most minute detail (2, 3).

Videos work the same way; as the video plays, the regions will follow their trail (1). These regions can also be updated in the same manner (2).
